Backing up your SocialEngine website is one of the most important steps that you can take to ensure the integrity and longevity of your SocialEngine website. Whether you're installing a new plugin or theme, upgrading to the latest version, or customizing SocialEngine's code, you should backup your website as often as possible.
Disclaimer
This article will guide you through the process of making a backup of your site, however if you aren't familiar with the terms below, you should be cautious when performing the actions listed. Many hosting providers provide free (or inexpensive) backup systems that they can restore for you if necessary. We HIGHLY recommend that you start by consulting your web host to find out if they offer backup services.
Backing up a large database can get fairly complex. If your site is very big, the instructions provided below may not be suitable for your specific needs. If you have a large community, you are encouraged to contact your hosting provider. Alternately, you can contact one of our experts to discuss backup strategies that would be more suitable for your website.
What is a backup?
The term backup refers to making copies of data as an emergency insurance policy. In the event the original data is lost or damaged, you will be able to turn to your backups to restore the data in most cases. Note that backups are not fool-proof and are mainly to be used in cases of critical issues such as hardware malfunction, data corruption, and other major issues. A backup is not intended to be used for restoring on a whim as you can have some data loss if your database is large.
Note: Please set your site to “offline maintenance mode” before proceeding. (In your admin area, navigate to Settings > General Settings). This will ensure that new data (content or posts from users) is not being added to the database during the backup process. Leaving it online can cause the backup to be corrupted.
Backup SocialEngine via cPanel
Many hosting providers use cPanel as a control panel for your web hosting services. This video will guide you through the process of backing up your SocialEngine files and database if your hosting provider provides you with cPanel.
Video Tutorial
What's the most important thing to backup?
If your hosting provider does not provide you with cPanel then you can manually create a backup of your site. SocialEngine is a robust database-driven application, and as you might have guessed, your database is the most important thing to backup. This is the "meat and potatoes" of SocialEngine, where your website's most valuable data resides.
Most hosting providers include some sort of database management tool within their control panel software which you can use to backup your MySQL database. In many cases, the software that they include is a version of phpMyAdmin. If you are not sure how to access phpMyAdmin or are not sure if your host provides access to the software from their control panel software, please contact your hosting provider's support staff and request additional instructions.
If your hosting provider uses some other database management tool, or does not provide access to any MySQL database management tools, you can download a copy of the software from the phpMyAdmin website. Please check with your host for assistance with this.
Before you can create a backup of your SocialEngine database, you will need to know the name of your SocialEngine database and perhaps the login credentials for the database. If you don't have this information memorized or recorded someplace, you can easily retrieve it from the database configuration file that SocialEngine stores during the installation process.
Using an FTP client, connect to your server and navigate to the "/applications/settings/" directory within your SocialEngine installation. Download the file "database.php" and open it with a text editor (Notepad++, Sublime Text, Netbeans are all free). Within this file, you will see code very similar to the following PHP code:
'mysqli', 'params' => array ( 'host' => 'localhost', 'username' => 'username_here', 'password' => 'password_here', 'dbname' => 'database_name', 'charset' => 'UTF8', 'adapterNamespace' => 'Zend_Db_Adapter', ), 'isDefaultTableAdapter' => true, 'tablePrefix' => 'engine4_', 'tableAdapterClass' => 'Engine_Db_Table', ); ?>
The contents of your configuration file will be different, however the structure of it should be very similar. If you are not familiar with PHP, much of this will seem like a jumbled mess. The only information you really need to be concerned with are the lines of code in the file that resemble the following (around lines 5 - 8):
'host' => 'localhost',
'username' => 'username_here',
'password' => 'password_here',
'dbname' => 'database_name',
If this were data from an actual SocialEngine database configuration file, these lines would indicate the connection information for the database is as follows:
MySQL database host: localhost
MySQL database username: username_here
MySQL database password: passwod_here
MySQL database name: database_name
Notice that the affixed single-quotes and commas are removed. Armed with this information, you are ready to connect to your MySQL database and create a backup.
Backup the Database
- From main page of phpMyAdmin, locate and click on the "Export" menu item.

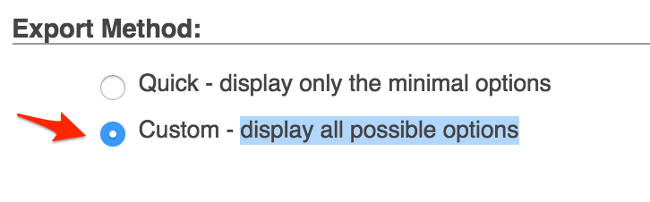
- Under “Export Method”, choose “Custom - display all possible options”.
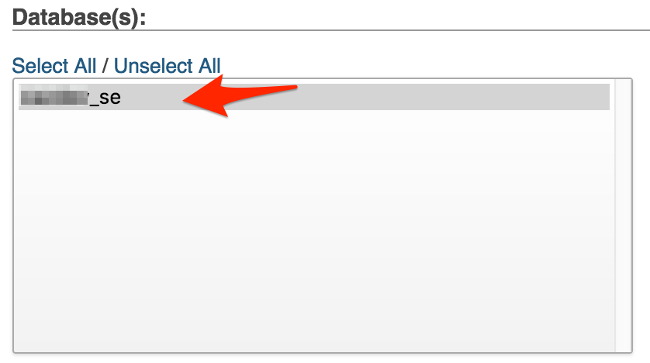
- Locate the section of the page labeled "Databases". Select the name of your SocialEngine database.
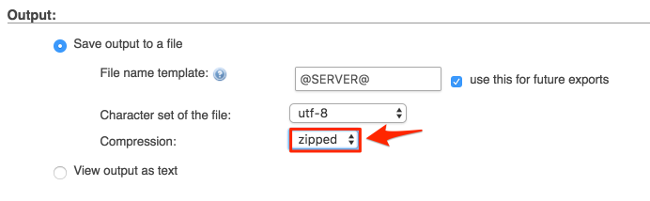
For “Output”, select the compression. For large database exports, you might want to zip the file. Ensure that the checkbox next to "Save output to a file" is selected.
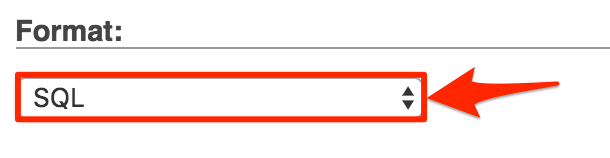
- “Format” should be “SQL”.
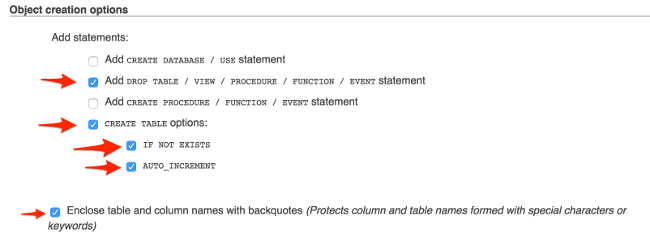
- Under “Format Specific Options”,locate the section labeled "Object creation options". Select the following options below “Add statements”:
A little further down the page, you should notice the section labeled "Data Creation Options". Select the following items below it:
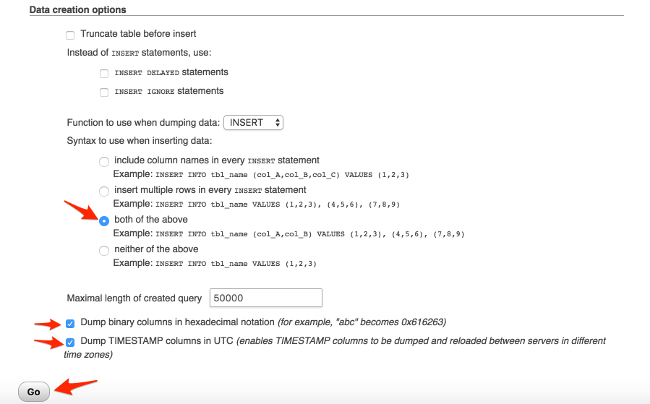
- Finally, click on the "Go" button to begin the export and wait for the file to download.
Backing Up Your Files
The core SocialEngine application files will not change often, however before you install, upgrade or make any changes to SocialEngine's files, you should take a backup. The most important files to backup, are those that drive the application. These are the files that exist within the following directories within your SocialEngine root:
application/
externals/
install/
In addition to these directories, the following files within your SocialEngine root should be included in your backup:
.htaccess
index.php
robots.txt
xd_receiver.htm
All of SocialEngine's application files total less than 50Mb. This makes FTP (File Transfer Protocol) a viable option for quick backups prior to performing an upgrade or plugin installation. You can simply download these files and directories to your computer using an FTP client and archive them as needed.
If you don't already have an FTP client, you can use Filezilla, which is a free cross-platform FTP application. You may download a version of Filezilla compatible with your operating system on the download section of their website. Instructions on how to use Filezilla are included within the documentation section of their website.
Restoring your Backup
If you encounter a situation when your site stops functioning due to a change, upgrade, or third-party plugin installation, you'll need to restore the backup you made. Follow the instructions below to restore your site.
Restoring your Database
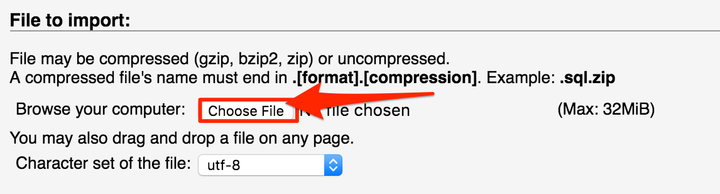
- From the main page of phpMyAdmin, locate and click on the "Import" menu tab.

- Click on the file upload dialog and locate the exported file you wish to import (the file you downloaded in the previous section).
- Locate the section titled "Format of imported file" and ensure that "SQL" is selected.(See step 5 under “Backup the Database”)
- Click the "Go" button to begin importing.

