
Notifications
 Filed in Overview
#SocialEngine
#Push Notification
#Browser Notification
#Notification
#Tutorial
123 views
Filed in Overview
#SocialEngine
#Push Notification
#Browser Notification
#Notification
#Tutorial
123 views
The Web & Mobile Browser Push Notification Plugin lets your users receive real-time notifications directly in their web or mobile browser, even when they are not actively browsing your website.
Once configured, users can receive alerts for relevant activities and updates without having to keep your website open in an active browser tab.
Initial Setup & Configuration
Log in to your SocialEngine Admin Panel.
Navigate to the Plugins section.
Click Install and Manage Packages and search for Web & Mobile Browser Push Notification.
Install the plugin and return to the admin panel
Go to Enabled Plugins and find the Web & Mobile Browser Push Notification
Click Settings and then enter the license key to activate the plugin
These settings go with all the member levels
License Key
Enter the license key provided with your plugin purchase. The license key is required to activate and use the plugin.

Enable Browser Notifications
Choose whether to enable browser push notifications for your website.
Yes: Enables browser push notifications for subscribers.
No: Disables browser push notifications.

Subscription Prompt Style
Choose how the subscription request should appear to users when asking them to allow push notifications.
You can choose from:
Native Browser Prompt: Uses the browser's standard notification permission prompt.
Bell Prompt: Uses a bell-style prompt to draw users' attention to the notification subscription option.
Basic Popup Prompt: Displays a simple popup asking users to subscribe.
Custom HTML Popup Prompt: Displays a customizable HTML popup for the subscription request.
These options appear when you select one of the popup-based prompt styles.

Under each options, you will get the same fields to configure: 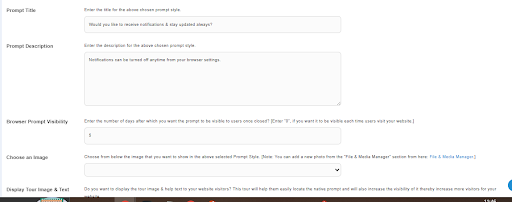
Prompt Title
Enter the main heading users will see on the subscription prompt. Use it to quickly tell users what the prompt is asking them to do.
Prompt Description
Enter supporting text that explains why users should subscribe to push notifications.
Browser Prompt Visibility
Set how long the subscription prompt should remain hidden after a user closes it.
Enter 0 to show the prompt again whenever the user visits the website.
Enter a number such as 7 to wait 7 days before showing it again.
This setting helps prevent the subscription prompt from appearing too frequently to users who have previously dismissed it.
Choose an Image
Select the image to display inside the subscription prompt. An appropriate image can make the prompt more noticeable and help users understand what they need to do.
You can add new images through File & Media Manager.
Custom HTML Prompt Height
*Available only with Custom HTML Popup Prompt.
Set the height of the custom HTML popup to control how much vertical space it occupies on the user's screen.
Custom HTML Prompt Width
*Available only with Custom HTML Popup Prompt.
Set the width of the custom HTML popup to control how wide the prompt appears on the user's screen.
Display Tour Image & Text
Choose whether to show an image and guidance text that helps users find and understand the browser's notification permission prompt. Select Yes if you want to provide users with additional visual guidance for subscribing to notifications.
Tour Help Text
Enter a short message that explains why users should subscribe to push notifications or guides them on how to allow notifications.
To use web and mobile browser push notifications, you first need to connect the plugin with Firebase Cloud Messaging (FCM). You can do this by creating a Firebase project, registering your website as a web app, and adding the required Firebase details to the plugin.
Create a Firebase Project
Go to the Google Firebase Console and sign in with your Google account.
From the Firebase Console, click Create a Firebase project.
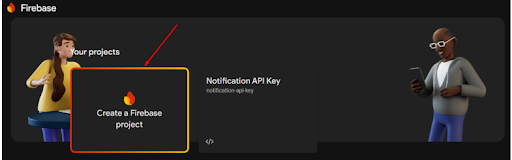
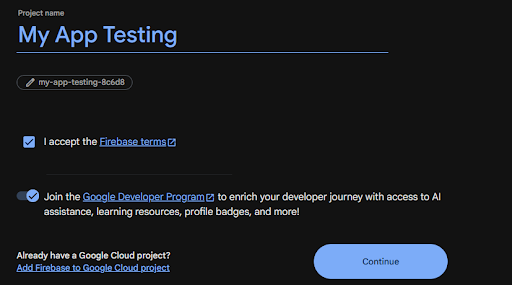
Enter a Project Name for your project and click Continue.
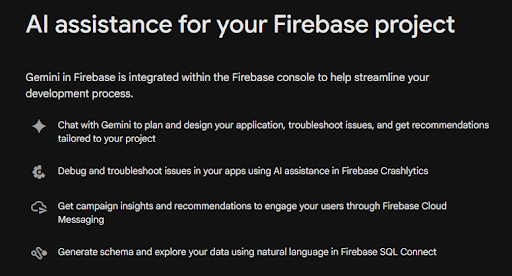
If Firebase asks you to enable Gemini, click Continue.
You may also be asked to enable Google Analytics. Click Continue, select a Google Analytics account if required, and then click Create Project.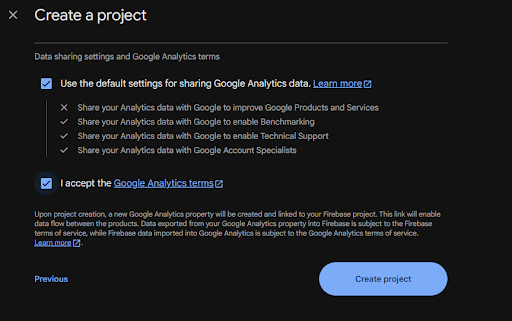
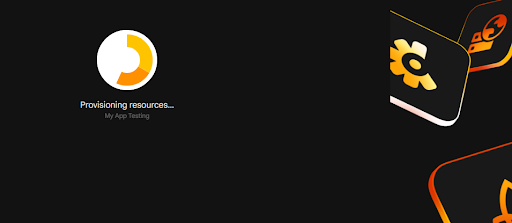
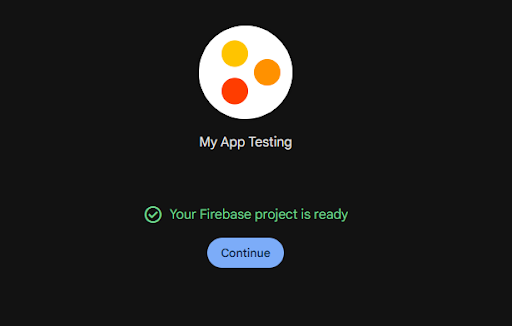
Once your project is created, click Continue to open the project console.
Register Your Website as a Web App
From your Firebase project console select Add App.
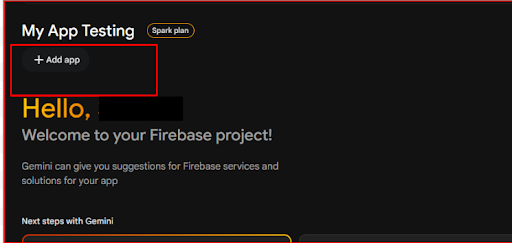
Click the Web icon (</> to add your website as a web app.
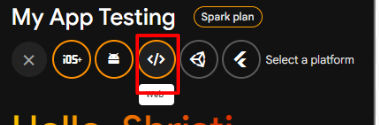
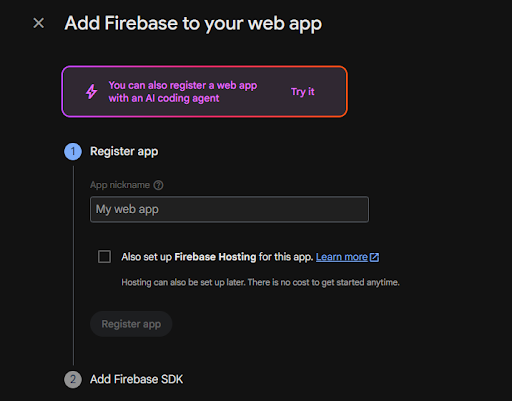
Enter a Nickname for your web app and click Register app.
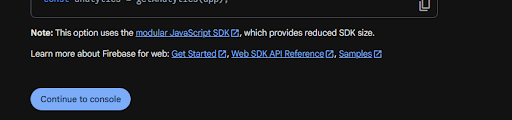
Once the app is registered, click Continue to the console.
Get the Firebase Configuration Object
From your Firebase project, open Project Settings. On the General settings page,
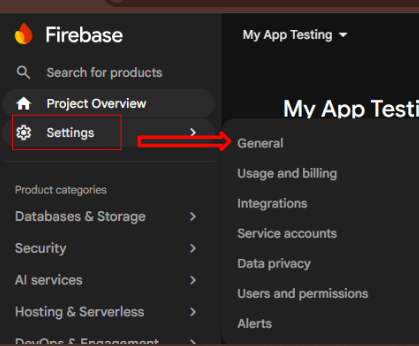
Scroll down to the Your apps section and find the SDK setup and configuration area.
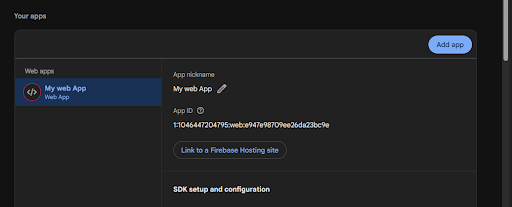
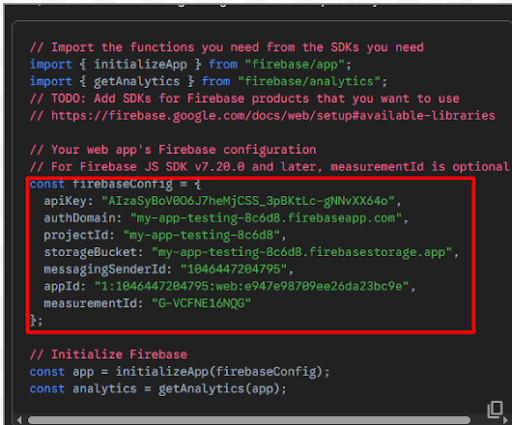
Select Config and copy the configuration code from the opening { to the closing }. This is the configuration object that you need to add to the plugin.
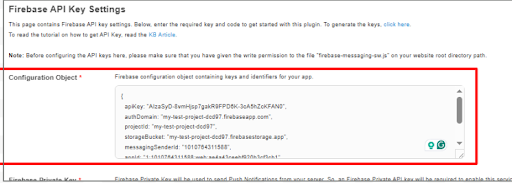
Now, open your SocialEngine Admin Panel and paste the copied configuration object into the Configuration Object field.
Generate the Firebase Private Key
13. Go back to your Firebase project and open the Service accounts tab from Project Settings.
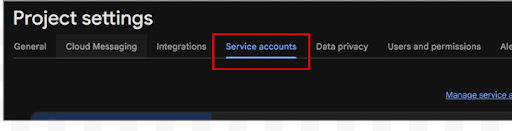
14. Scroll down and click Generate new private key.
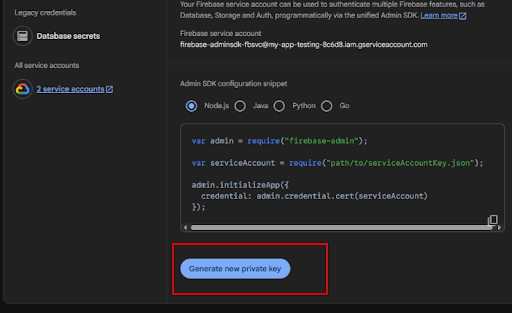
15. Firebase will download a .json file containing your private key information.
Open the downloaded JSON file using a text editor and copy the private key ID contents.
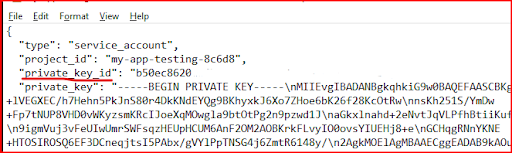
17. Return to the plugin's API Settings tab in your SocialEngine Admin Panel.

Paste the copied JSON content into the Firebase Private Key field.
Once you have entered both the Configuration Object and Firebase Private Key, click Save Changes.
Your Firebase connection is now configured, and you can use the plugin to send and receive web and mobile browser push notifications.
After a user subscribes to push notifications, you can automatically send them a welcome notification. Use this section to decide whether to send one and customize what it says.
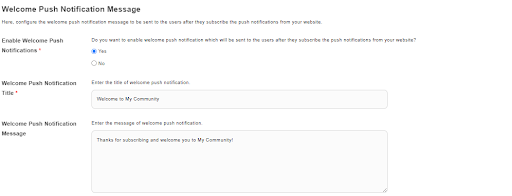
Enable Welcome Push Notifications
Choose whether to send a welcome push notification to users after they successfully subscribe to browser push notifications.
Yes: Sends the configured welcome notification to new subscribers.
No: Does not send a welcome notification.
Welcome Push Notification Title
Enter the title of the welcome notification that users will see when they receive it.
Welcome Push Notification Message
Enter the message you want to send to new subscribers as part of the welcome notification.
Redirect URL
Enter the URL where users should be taken when they click the welcome push notification.
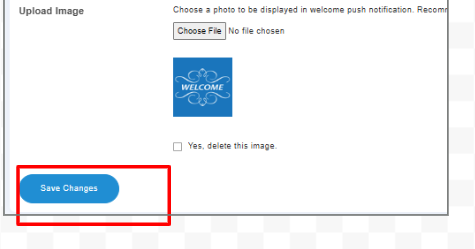
Upload Image
Upload an image to be displayed with the welcome push notification. Use an image that complements your welcome message and helps make the notification more recognizable. The recommended image size is 100 × 100 pixels.
Once you have configured the welcome notification settings and uploaded the image, click Save Changes to apply and update the settings.
Use this section when you want to send a push notification manually to your website and Mobile subscribers. You can decide who should receive the notification, write the message, add an image, and send users to a specific page when they click it.
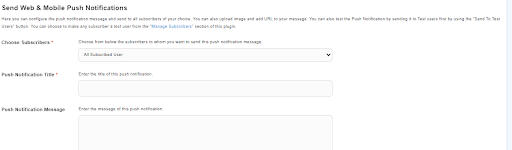
Choose Subscribers
First, choose which subscribers should receive the notification. The available options are:
All subscribers: Choose this option to send the notification to everyone who has subscribed to your website's push notifications. This is useful for announcements, important updates, or messages that are relevant to your entire community.
Member Level: Choose this option when you want to send the notification only to subscribers who belong to a specific member level.
Networks: Choose this option when you want to send the notification to subscribers belonging to a specific network on your website. This is useful when you want to send an update relevant only to members of a particular network, rather than to your entire community.

In each of the options, you will get the settings to configure each of them with respective fields:
Push Notification Title: Enter the title users will see when they receive the notification. Keep the title short and clear so users can quickly understand what the notification is about.
Choose Member Level: This setting comes when you select a member level to send the notification. Then choose the desired member level you want to send the notification.
Push Notification Message: Enter the message you want to send to your selected subscribers. Use this space to provide the main information or update you want users to know.
Redirect URL: Enter the page you want users to visit when they click the notification.
For example, if your notification is about a new event, you can add the event page URL here so users are taken directly to it.
Enter the complete URL, including http:// or https://.
Upload Image: Add an image to appear with the push notification. You can use an image that relates to the announcement or content you are sharing.
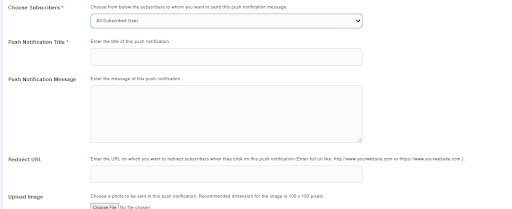
Once you have selected the subscribers and added your notification details, click Send Now to send the push notification to them.

The Schedule Notifications section allows you to prepare a push notification in advance and choose when it should be sent. This is useful when you want to plan announcements, reminders, or updates for a specific date and time instead of sending them immediately.
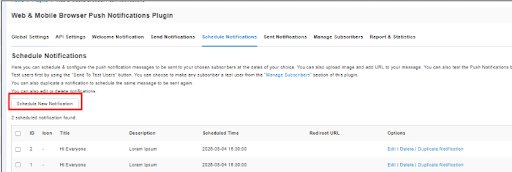
Click Schedule notification to create a new notification for your audience.
Choose Subscribers: Choose who should receive the scheduled notification.
You can select from the available subscriber groups, such as:
All Subscribed Users: Sends the notification to everyone who has subscribed to push notifications.
Member Level: Sends it only to subscribers belonging to a selected member level.
Network: Sends it to subscribers belonging to a selected network.
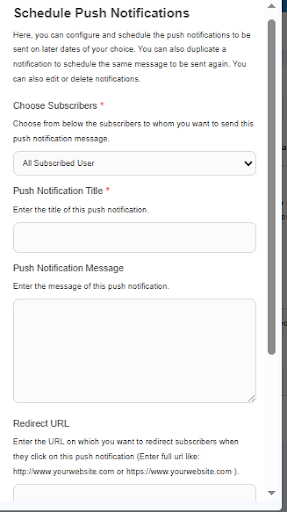
Push Notification Title: Enter the title users will see when they receive the notification.
Push Notification Message: Write the message you want to send to the selected subscribers.
Redirect URL: Enter the page you want users to visit when they click the notification. For example, you can direct them to a specific event, announcement, or other page on your website. Enter the complete URL, including http:// or https://.
Upload Image: Choose an image to include with the notification. The recommended image size is 100 × 100 pixels.
Choose Date: Select the date and time when you want the notification to be sent. Choose the date first, then select the hour and minute, followed by AM or PM.
Scheduled Notifications Table
Once you create scheduled notifications, they appear in a list on the Schedule Notifications page. The table helps you review and manage the notifications that are waiting to be sent.
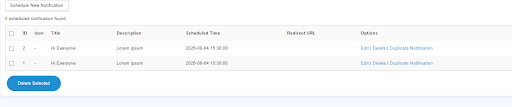
|
Column |
What it shows |
|
ID |
The unique ID assigned to each scheduled notification. |
|
Icon |
Shows the image added to the scheduled notification, if any. |
|
Title |
Displays the title of the notification. |
|
Description |
Shows the message included in the notification. |
|
Scheduled Time |
Shows the date and time when the notification is set to be sent. |
|
Redirect URL |
Shows the page users will be taken to when they click the notification. |
|
Options |
Provides actions such as Edit, Delete, and Duplicate Notification. |
Delete Selected
If you want to remove multiple scheduled notifications at once, select the checkbox next to each notification you want to delete and click Delete Selected. This removes all the selected notifications from the scheduled list.

The Sent Notifications section keeps a record of the push notifications you have already sent. You can search past notifications, resend them, view their performance, or delete them when they are no longer needed.
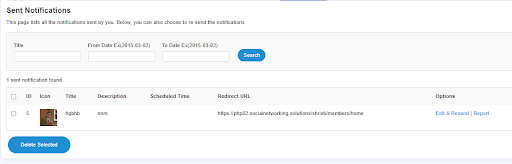
Search Filters

|
Filter |
What it does |
|
Title |
Enter the title of a notification to find a specific sent notification. |
|
From Date |
Enter the starting date to find notifications sent from that date onward. |
|
To Date |
Enter the ending date to find notifications sent up to that date. |
|
Search |
Click Search to view notifications matching the filters you entered. |
Table Columns

|
Column |
What it shows |
|
ID |
The unique ID assigned to the sent notification. |
|
Icon |
The image added to the notification, if any. |
|
Title |
The title of the sent notification. |
|
Description |
The message included in the notification. |
|
Scheduled Time |
The date and time associated with the notification. |
|
Redirect URL |
The page users are taken to when they click the notification. |
|
Options |
Provides actions such as Edit & Resend and Report for the notification. |
Edit & Resend
When you click Edit & Resend, the plugin opens the notification details again. You can review or change the subscribers, title, message, redirect URL, and image before sending it again.
You can also choose whether to send the notification immediately or schedule it for later using the Schedule Notification option.
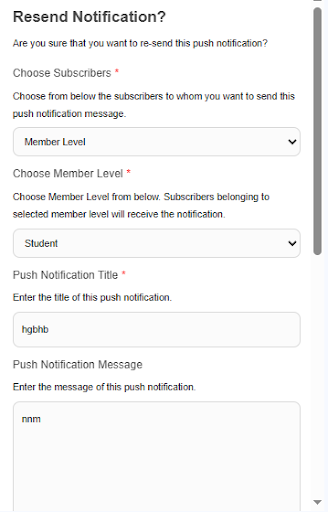
Report
Click Report to see how the selected notification performed. The report shows:
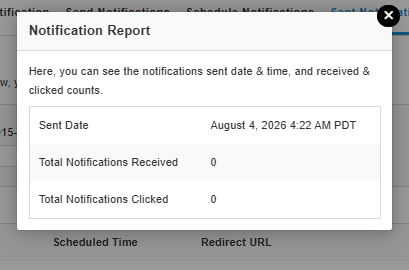
|
Report Detail |
What it tells you |
|
Sent Date |
The date and time when the notification was sent. |
|
Total Notifications Received |
The total number of notifications received by users. |
|
Total Notifications Clicked |
The number of times users clicked the notification. |
The Manage Subscribers section shows the users who have subscribed to receive push notifications from your website. From here, you can find specific subscribers, choose users as test users, and send notifications to selected users.
You can use the available filters to quickly find a particular subscriber. If you leave all the filters blank and click Search, the page will show all push notification subscribers on your website.
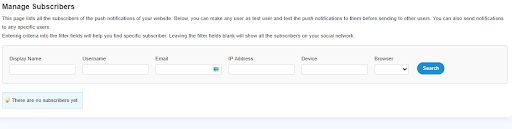
Search Filters
|
Filter |
What it does |
|
Display Name |
Search for a subscriber using the name displayed on their profile. |
|
Username |
Search for a subscriber using their username. |
|
|
Find a subscriber using their registered email address. |
|
IP Address |
Search for subscribers using the IP address associated with their subscription. |
|
Device |
Find subscribers based on the device they use to receive push notifications. |
|
Browser |
Search for subscribers based on the browser they use for push notifications. |
|
Search |
Click Search to display subscribers matching the information entered in the filters. |
The Report & Statistics section gives you a quick overview of how your push notifications are performing. You can select a date range to see the notification activity for a specific period.
|
Note: This report only includes push notifications sent from the Admin Panel of this plugin. It does not include notifications sent through your website's built-in notification system. |
Search Filters

|
Filter |
What it does |
|
From Date |
Enter the starting date for the period you want to check. |
|
To Date |
Enter the ending date for the period you want to check. |
|
Search |
Click Search to view the notification statistics for the selected date range. |
Notification Statistics

|
Statistic |
What it shows |
|
Total Notifications Sent |
Shows the total number of push notifications sent during the selected date range. |
|
Total Notifications Received |
Shows how many notifications were successfully received by users during the selected period. |
|
Total Notifications Clicked |
Shows how many times users clicked the push notifications during the selected period. |