
Notifications
 Filed in Admin Panel
#SocialEngine
#language
#translation
#Google
#Tutorial
#Google Translation
193 views
Filed in Admin Panel
#SocialEngine
#language
#translation
#Google
#Tutorial
#Google Translation
193 views
About
SocialEngine Community allows you to make your community available in multiple languages. Using the Language Manager, you can create new language packs, import existing language packs, edit translated phrases, and choose which language should be used as the default language for your community.
This is useful when your community serves members who speak different languages or when you want to provide a localized experience for your audience.
Get Started
You can manage the languages and translations for your community from the Language Manager in the Admin Panel.
To access the Language Manager:
Log in to your SocialEngine Community Admin Panel.
From the admin dashboard, navigate to Appearance, then select Language Manager.
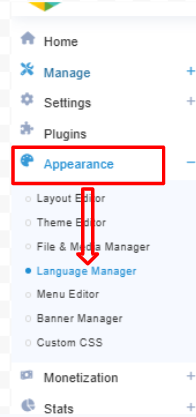
You will be redirected to the Language Manager page, where you can view and manage the language packs installed on your community.
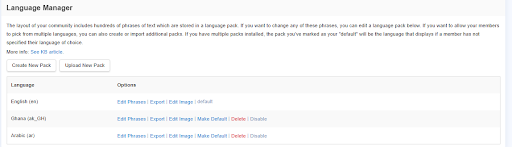
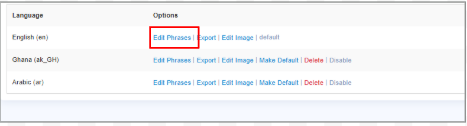
For example, in the screenshot above, English (en) is currently marked as the default language. Other installed languages, such as Ghana (ak_GH) and Arabic (ar), can be managed separately.
In This Tutorial
We’ll cover the following:
Create New Pack
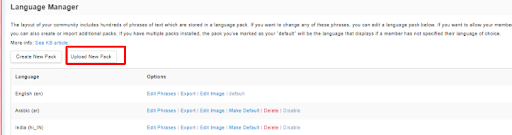
Upload New Pack
Edit phrases, export language, and manage them.
To add a new language for your community, click Create New Pack

Then, from here you can choose the language that you want to add. And click Create 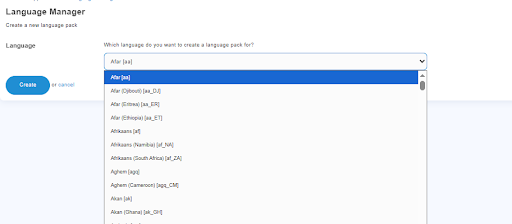
Then you can find the added language in the table.
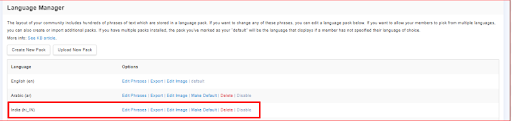
If you already have a language pack available, you can upload it directly to your SocialEngine Community instead of creating and translating a new language pack manually.
Upload the file and wait for the language pack to be processed. Once the upload is complete, the new language will appear in the Language Manager table.
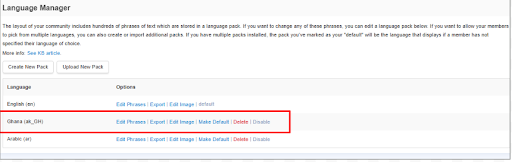
For example, we have added the Ghana language package here while uploading.
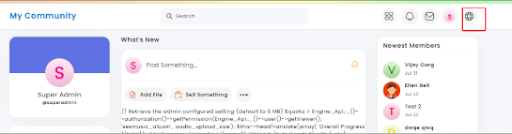
The user can change the language from the site by going to the home page and locate language changing option.
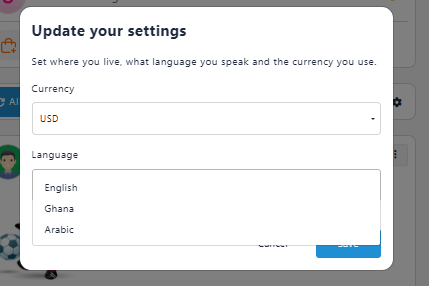
Then, from the language menu, you can find the package we have added, and the language we kept is also there, as shown in the table. Click Save to update the changes.
The Language Manager table allows you to manage the text displayed throughout your SocialEngine Community. You can edit existing phrases, add new phrases, search for a specific phrase, and customize the language pack according to your requirements.
Search & filter Phrases
If your language pack contains a large number of phrases, you do not need to go through each phrase manually. The Search and filter feature allows you to quickly find a specific phrase.
With the filter, you will get options:
1. All
2. Missing
3. Translated
Edit Phrases
The Edit Phrases page displays the text phrases currently available in the selected language pack.
Each phrase includes:
Original Phrase: The original text provided by SocialEngine, shown below the editable phrase for reference.
Translation Field: The editable area where you can enter or modify the phrase in your desired language.
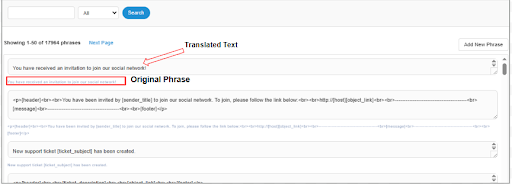
For example, if you are creating a French version of your community, you can replace an English phrase with its French translation. The translated text will then be displayed wherever that phrase is used throughout your community.
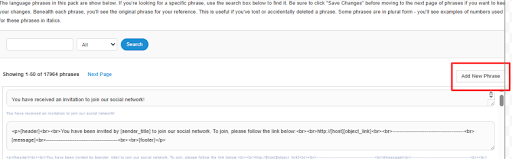
You can also add a new phrase to it if you didn't find the text
Export
The Export option allows you to export an existing language pack.
You can use this when you want to save a language pack or use its translations on another compatible SocialEngine Community installation.
To export a language pack:
Click Export.
Follow the download prompt to save the language pack.
The exported language will show in the table.
Edit Image
The Edit Image option allows you to select an image associated with the language.
When you click Edit Image, a Choose an Image window appears.
The window allows you to select an image that will be shown with the language. The selected image can appear in both the User Panel and Admin Panel.
To select an image:
Click Edit Image next to the required language.
The Choose an Image window will open.
Select an image from the available options.
Click Save.
The selected image will be associated with that language.
If you leave the image field blank, no image will be displayed for the language.
Make Default
The Make Default option allows you to set a language as the default language for your community.
To make a language the default:
Click Make Default.
The selected language will be marked as default.
The default language is used when a member has not selected a specific language preference.
The currently selected default language will show default instead of the Make Default option.
Delete
The Delete option allows you to permanently remove a language pack from your community.
To delete a language:
Locate the language you want to remove.
Click Delete.
Confirm the deletion if prompted.
Once deleted, the language pack and its translations will no longer be available in your community.
|
Note: Avoid deleting a language pack if you may need its translations later. If you only want to temporarily prevent its use, consider using Disable instead. |
Disabled
The Disable option allows you to temporarily deactivate a language pack without deleting it from your community. This is useful when you want to stop members from using a particular language while keeping its translations available for future use.