You’ve made a great decision to migrate your website to our SocialEngine product. With the help of an importer plugin, you’ll have your users and content imported in no time! This tutorial will walk you through the process.
What You Need for this Import:
- A freshly installed SocialEngine website (with plugins also installed if needed) on the same server as your phpFox website (required). Best in a subfolder
- A phpFox website and access details for your database.
Where to Start
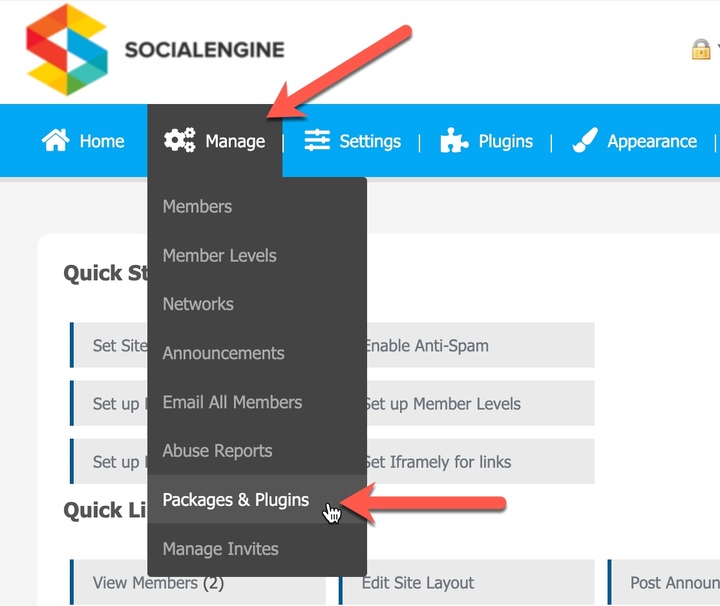
You’ll need to be logged in to your SocialEngine Admin Panel and navigate to Manage > Packages & Plugins
Importing the phpFox Data
*Ensure you are logged in with the Super Admin user at your SocialEngine Admin Panel.
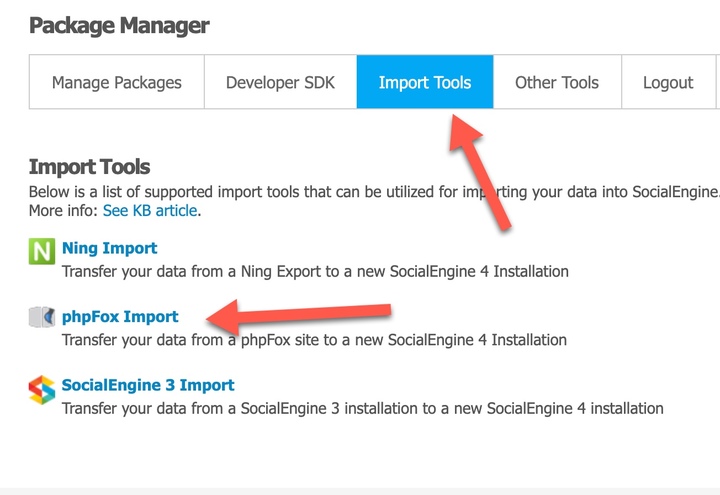
- In the Package Manager click the Import Tools menu. If not in the Package Manager navigate to Manage > Packages & Plugins as shown above in the “Where to Start” section above. Select “Phpfox Import”.
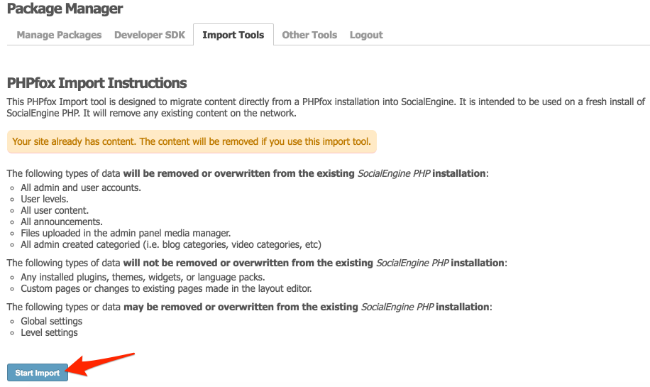
- Read the instructions carefully on this screen and then click “Start Import” when you are ready to proceed.
- Choose whether you are importing from phpFox v3 or v4.
- Ensure that the path to your phpFox site is correct.

- Check that the email is correct for the Super Admin user. You must enter an email.
- Super Admin Password - If you leave this blank, it will use 123456 for your Super Admin password. We recommend adding a password instead of using the 123456 default one.
- Enter the User Group names in the provided input boxes for each User Group. If you haven’t changed them from the default ones, you can leave these boxes empty.
- Choose whether to import in “Test Mode” or “Live Mode”.
- For “Test Mode”, you will also have an option to set “Test Passwords” for the members being imported or leave it blank to generate a standard “123456” password.
- For “Live Mode”, you will see a warning to set your phpFox site to “Offline Mode” and you will have an option to choose email members a new password or do nothing and let them set their own new password when they come to log in after the import.
- The following are for Advanced users and only show if you click the “Show Advanced Options” at the top of the Import page.

- Choose an email address to receive progress reports regarding the import process.
- Choose the options you want for the progress emails by clicking the checkbox to the left of each option to enable/disable them.

- Enter a time, in minutes, that you want to receive the progress emails.
- Choose whether you want to receive data as all one report or in separate requests for the progress emails.
- Choose whether you want to resize imported photos. This can make the process much longer if you do resize the photos.
- Choose if you want to skip clearing cache. We recommend not to skip this step.
- Enter a value for the “Rows per request” and “Rows per select” or leave it at default.

- Enter a value for the “Max time per request” or leave it at default (240).
- Select the steps you want to disable if you want to disable any, and when done click “Import”.
- The import process will now run and show messages for whether everything went fine and was a success, or whether there were errors and failures. You’ll see a “Complete” message once the process is done.

- When you click to go back to your Admin Panel, you will be logged out and have to log back in. This is normal and part of the process for security purposes.
If there are no errors in your list, congratulations! You’re done importing and can enjoy your site. If you see errors in the list, you can contact our support for assistance if needed.
Notes and Tips
- Due to phrase changes throughout phpFox v4, you may see issues with custom categories showing oddly. You will need to manually fix these categories should you find them. In your Admin Panel, navigate to “Settings” and find the module that you need to fix the categories for. Select that module and edit each category as you need to. Repeat for any that you find necessary.
- Due to how forums are set up in SocialEngine and phpFox, you may see blank duplicate forums for your main forum categories from your phpFox site. You can delete the duplicated ones or keep them to use for posting.
- phpFox has Blogs, Videos and Events for the Pages/Groups. SocialEngine does not have that. You might want your members to move any group or pages blogs into their group/pages discussion area before import. They could do the same for videos they may have shared in their pages/groups video area.
- After the import, you will want to check your member levels in SocialEngine to ensure you have the settings as you want them. SocialEngine has some extra settings that phpFox does not have.
- The importer can take some time to run. Please ensure you allow it to run fully as some steps will take a “break” so to speak and you will notice a delay in the import process. If you notice nothing happening for several minutes, you would want to pause the import and check your logs for errors. Your logs can be found in the temporary/log folder. In that folder, look for the main.log file.
- Final tip is to enjoy your new SocialEngine community! It is an awesome change and you’ll find some really great things in it. Want to know more? You can find data66 (Donna), formerly from phpFox, in our community here. She would love to hear from you! Feel free to “Follow” her, pm her, or post in our community to introduce yourself.

