
Notifications
SSL is a protocol that encrypts the data being passed back and forth between a web browser and a website’s server.
Think of it this way: you are passing a note to someone across the room. Normally, anyone who’s helping to pass it along can simply open the note and read it. With SSL, you put the note in a locked box, and your target has the key. Now no one can read your note unless they have the key.
In this analogy, your note is the packets of data being carried by the HTTP protocol, the lockbox is the SSL encryption, and the key is called an SSL certificate. Enabling this SSL system on your site will provide your users with a more secure browsing environment.
Usually, data packets are sent via the HTTP protocol. When you add the security of SSL encryption, you will use the secured version: HTTPS. Here’s what you’ll need to do:
The SSL certificate is given to you by a Certificate Authority. You can search online for a list of Certificate Authorities, or your hosting provider might offer an easy way to purchase an SSL.
When you request an SSL certificate, you will need to provide some information to allow the CA to identify you. This information is stored in a Certificate Signing Request (CSR). After requesting and receiving your certificate, you will then install it on your server.
The process of obtaining an SSL certificate looks something like this:
Manually navigate to your site using https:// to make sure your certificate is properly configured. If you try this and run into any issues, please contact your hosting provider (not SocialEngine).
Now that you have your SSL certificate installed, you need to change the .htaccess file for your SocialEngine installation on your server so that all HTTP requests will be redirected to HTTPS. Here’s how:

Find the line of code that says

Immediately after that line, insert the following code:
RewriteCond %{HTTPS} !=on
RewriteRule ^ https://%{HTTP_HOST}%{REQUEST_URI} [L,R=301]

If you would like to add a www subdomain to your site, you can once again edit the .htaccess file at the path of your SocialEngine install on your server:
RewriteEngine On
RewriteCond %{HTTP_HOST} ^yourdomain.com [NC]
RewriteRule ^(.*)$ http://www.yourdomain.com/$1 [L,R=301] 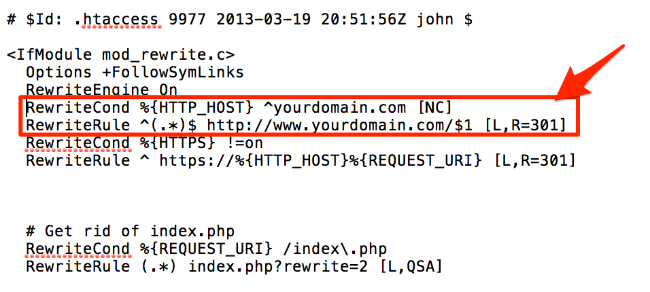
If you’d like to know more about SSL and the setup process, check out this site:
