Notifications
For very large social networks, it may be necessary to enable caching to improve performance. If there is a noticeable decrease in performance on your social network, consider enabling caching (or upgrading your hardware). Caching takes some load off the database server by storing commonly retrieved data in temporary files (file-based caching) or memcached (memory-based caching). If you are not familiar with caching, we do not recommend that you change any of these settings.
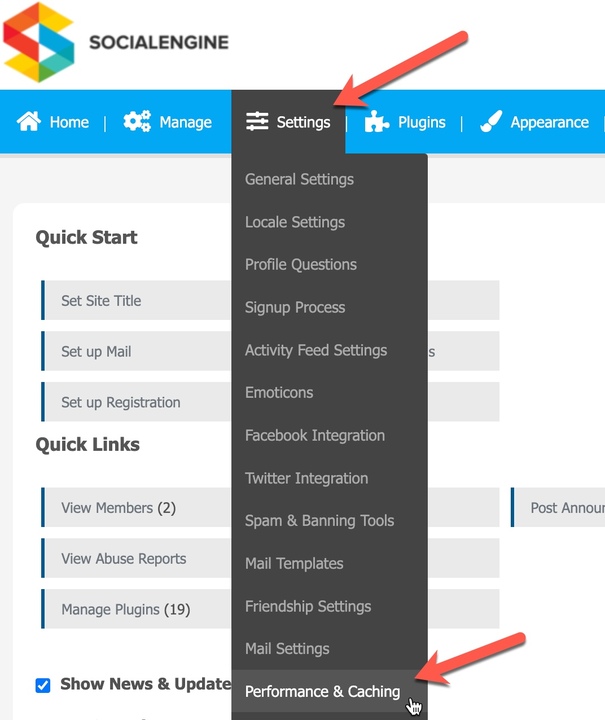
To find the “Performance & Caching” page, in your Admin panel navigate to Settings > Performance and Caching.

Select if you would like to enable caching or not. Enabling caching will lower CPU usage and will make pages load faster.
Determine how long the system will keep cached data. A shorter lifetime requires more CPU usage than a longer lifetime. We recommend starting off with 60-120 seconds.
Select the type of caching you would like to use if you have enabled caching. Memcached caching (if available) will use memory (RAM) which is not as abundant as disk space, however it will be faster than file-based caching when performing read/write operations.
Note: If you would like to use one of the other caching features other than File-based caching (Memcache, Redis), this feature will need to be installed on your server and configured to run with PHP before you can select this feature in the Cache Feature list. In addition, you will only be able to smoothly run one caching feature at a time. If you need assistance with installing any of these caching features on your server, your hosting provider should be able to assist you.
Memcached - If you are interested in installing Memcached, please see the Memcached page for more information or contact your host.
Redis - For more information about Redis, please see their official Redis page.
This is where the temporary files containing the cached data are stored. This folder must be writable (chmod 777). This should be a path relative to the base directory where SocialEngine is installed. Select either “File Locking” or “Flush Cache” for the directory.
File Locking? - Selecting “File Locking” disables the editing of any of the contents in this directory by more than one process at the same time. It is recommended that this box be left checked at all times.
Flush cache? - Checking this box before clicking on "Save Changes" would erase all the data in this directory, clearing your current cache.
Empty Log Files Automatically? - Checking this option will have the error log automatically clear once it reaches the size set.
Log Size - Set the size for when to clear the error log. This is in megabytes (MB) and needs to be a whole number (1, 2, 3, etc). Once the log reaches this size, it will clear on the next error generated.
Select this option to convert your CSV (comma separated value) language pack files into a PHP array for each language your site is available in. This method is shown to improve response times in server side page rendering.
Note: Certain third party plugins' language packs may not be in the proper syntax to successfully convert into a PHP array. You should receive an alert if any issues arise during the conversion as it may not work if you have third party plugins.
This compresses all HTML text using GZip compression. It minimizes bandwidth by decreasing the size of the files that are sent from your server. Please make sure that your server supports this feature before enabling it.
Make sure you click the “Save Changes” button seen above when done making any changes on this page.
Note: If you are getting an error involving the "HTTP_ACCEPT_ENCODING" constant. The first thing you should do is disable this feature.