Notifications
 Filed in Admin Panel
#SocialEngine
#music
#playlist
#artist
#Song
1,717 views
Filed in Admin Panel
#SocialEngine
#music
#playlist
#artist
#Song
1,717 views
About
The Professional Music Plugin allows you to build a complete music-sharing experience within your SocialEngine community. Members can upload songs, create music albums and playlists, discover artists, browse music by categories, rate and share content, and manage their own music library.
The plugin also provides admins with powerful tools to manage music content, configure permissions, organize categories, integrate with other plugins, and customize music pages using the Layout Editor.
How to get started:
Before configuring the plugin, make sure it has been successfully installed and activated on your SocialEngine website.
Follow the steps below to get started.
Installation
Log in to your SocialEngine Admin Panel.
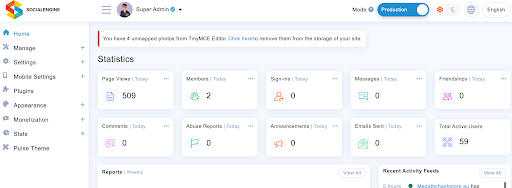
Navigate to Plugins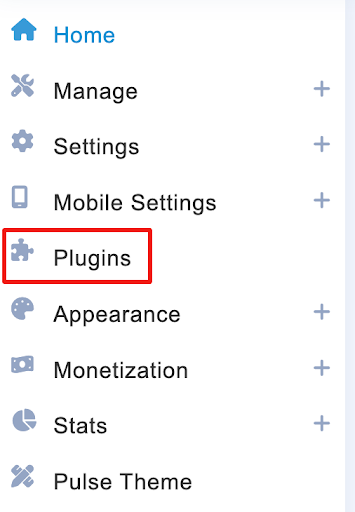
Click Install & Manage packages and search for the Professional Music Plugin, then install it
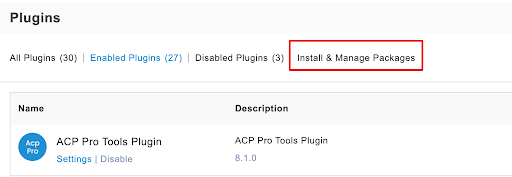
After installation, click Settings and enter your license key, which is delivered after purchase.

Under the Settings tab, you can manage the entire control of the community who are using the Music plugin.
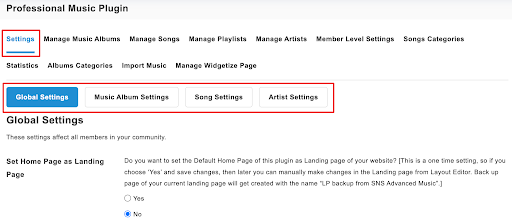
These settings affect the community with the settings which are provided in this.
Set Home Page as Landing Page
This setting lets you choose whether the Professional Music plugin’s default Home Page should become the main Landing Page of your website.
Yes: Replaces your current Landing Page with the plugin’s default Home Page. A backup of your existing Landing Page is created so you can restore or refer to it later.
No: Keeps your website’s current Landing Page as it is and does not use the plugin’s default Home Page as the Landing Page.

Playlist Default Photo
Upload or select a default playlist image that will be automatically assigned to newly created playlists. Leave this field empty if no default image is required. Click Save Changes to save the configuration.

|
💡 Note: You can upload photos from the Appearance < File & Media Manager. |
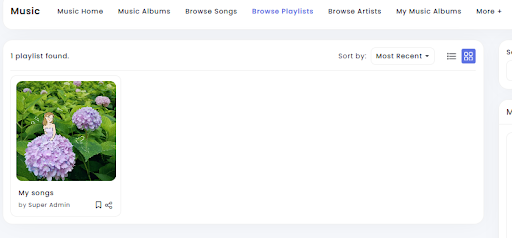
To preview the default playlist image, first create a playlist. Go to Browse Songs/Albums, select any song, and click Add to Playlist from the three-dot menu or action bar.
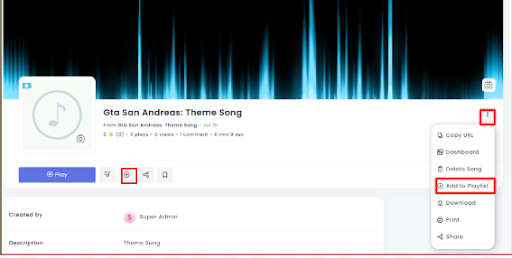
A pop-up window appears, enter the playlist name and description. You may also upload a custom playlist image. If no image is uploaded, the default playlist image configured by the admin will be automatically applied.
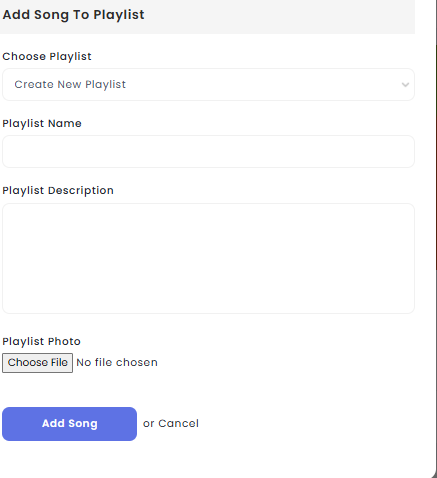
In the example below, no custom playlist image has been selected. As a result, the default playlist image set by the admin is displayed. Members can either use the default image or upload their own custom image while creating the playlist.
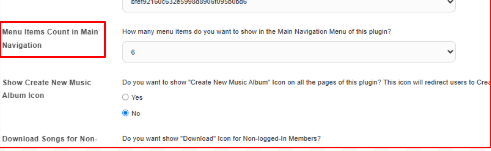
Menu Items Count in Main Navigation
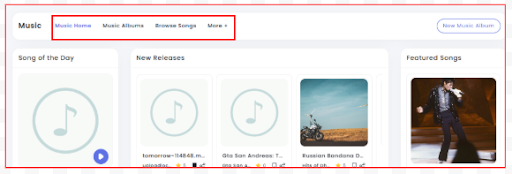
Select the maximum number of menu items to display in the main navigation menu. If the total number of menu items exceeds the selected limit, the remaining items will be automatically grouped under the More menu.
In the image below, the menu limit is set to 3. The first three menu items are displayed in the main navigation, while the remaining items are available under the More menu.
Show Create New Music Album Icon
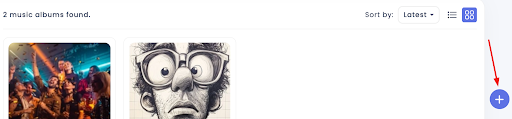
Enable this setting to display the Create New Music Album icon across all pages of the Music Plugin. This allows members to quickly create a new music album from any page without navigating to a specific section. Select No to hide this icon throughout the plugin.
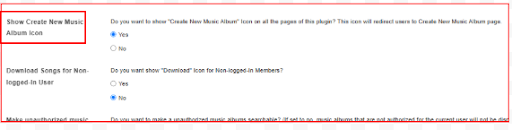
When enabled, members can create a new music album by clicking the Create New Music Album icon available on every page of the plugin. If this setting is disabled, the icon will no longer be displayed.
Make unauthorized music albums searchable
This setting decides whether users can see restricted music albums in search results and widgets, even if they do not have permission to view them.
Yes – Unauthorized music albums can appear in search results or widgets. However, when a user tries to open them, they will still be restricted according to the album's privacy settings.
No – Unauthorized music albums are completely hidden from search results and widgets for users who do not have permission to view them.
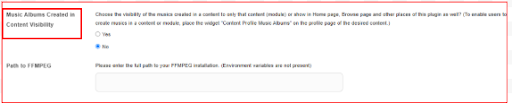
Music Albums Created in Content Visibility
This setting controls whether music albums created inside another content type (such as a Group, Event, Business, or other module) stay within that content or are also shown throughout the Music plugin.
When users create music albums using the Content Profile Music Albums widget on another module's profile page:
Yes – Those music albums are also displayed on the Home page, Browse Music page, widgets, and other sections of the Music plugin, making them discoverable across the website.
No – Those music albums remain visible only within the content where they were created (for example, only inside that Group or Event).
Music Creation Guidelines
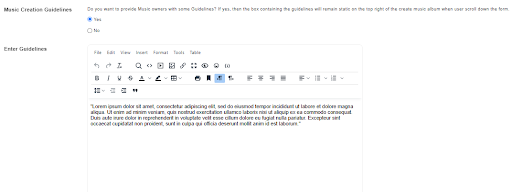
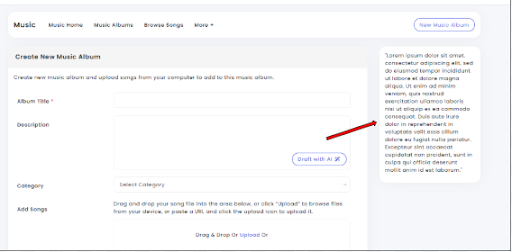
Enable this setting to display music creation guidelines for members while they create a new music album. When enabled, a guidelines panel remains fixed on the right side of the Create New Music Album page as users scroll through the form.
This helps members follow your community's rules and best practices while creating music albums.

After selecting Yes, a text editor appears where you can create and format your music creation guidelines. Enter the required instructions, rules, or recommendations, and click Save Changes to apply the settings.
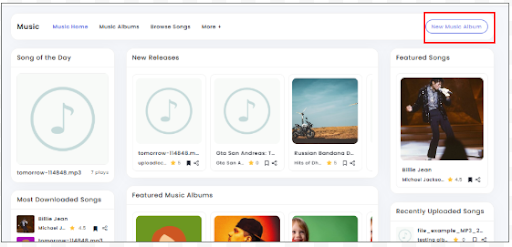
Click Create New Music Album to open the album creation page and view the music creation guidelines.
The guidelines are displayed in a fixed panel on the right side of the page that will allow members to refer to them while completing the album creation form.
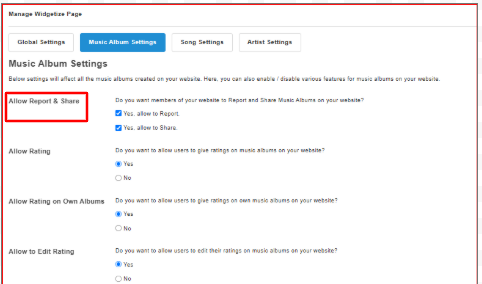
Allow Report & Share
Enable this setting to allow members to report and share music albums on your community. You can enable either option individually or enable both, depending on your community requirements. After configuring the settings, click Save Changes to apply them.
In this example, both Report and Share options are enabled to demonstrate how they appear on the user side.
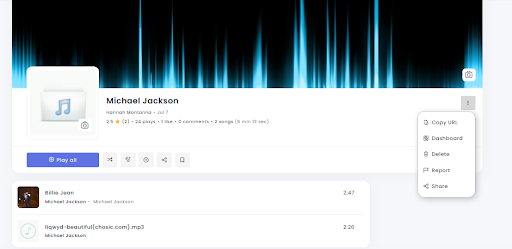
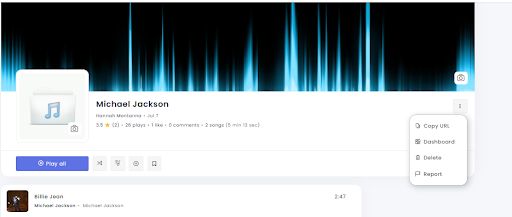
Open any music album and click the three-dot (⋮) menu to access the available actions. Depending on the admin settings, members can report or share the music album.
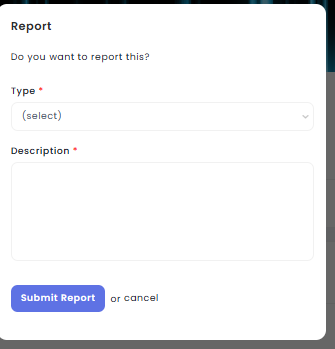
Click Report to open the report dialog. Select the appropriate report category, enter the reason for reporting the music album, and click Submit to send the report to the admin.
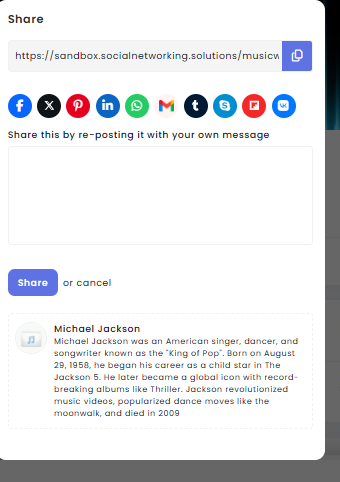
Click Share to open the sharing dialog. Members can copy the album link, share it through the available social platforms, or include a personal message before sharing.
If only the Report option and Share option are disabled, click Save Changes to apply the updated settings.
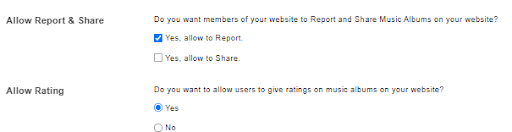
In the example below, only the Report option is available because the Share option has been unchecked by the admin. Members can report the music album, but they cannot share it.
Allow Rating
Ratings help other members discover popular and high-quality albums, encourage community engagement, and provide valuable feedback to music owners. If disabled, members will not be able to submit ratings for music albums.

When selecting Yes, two more options come up:
Allow rating on own albums: If enabled, music owners can edit their own rating in their music albums.
Allow to edit rating: If enabled, music owners or members can edit their own rating
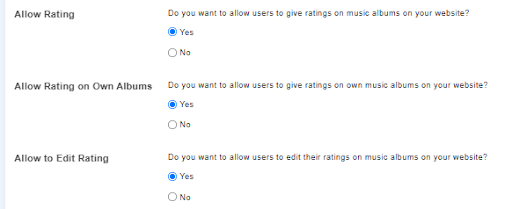
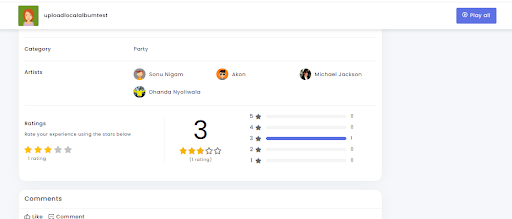
When you open a music album, the Rating section is displayed below the album details, where members and music owners can submit a rating.
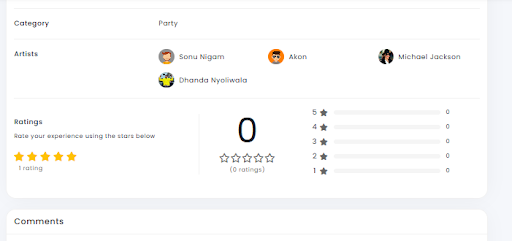
In the example below, both music owners and members can edit their ratings, as the Allow to Edit Rating setting is enabled.
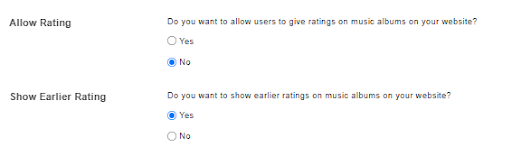
When the admin selects No to disable ratings, the following setting becomes available:
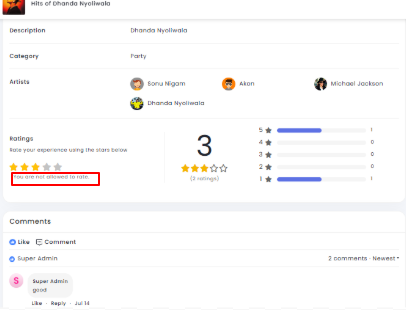
Show Earlier Ratings: If enabled, ratings submitted before the rating feature was disabled will continue to be displayed. These ratings are visible to members but cannot be edited or updated.
In the example below, previously submitted ratings are displayed in the Rating section. However, members and music owners cannot edit them.
If Show Earlier Ratings is also disabled, the Rating section will no longer be displayed on the music album page.
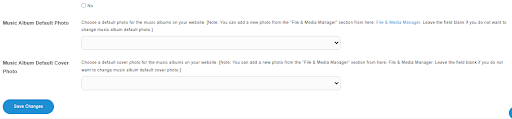
Music Album Default Photo
Admins can choose a default cover photo for music albums. This photo is automatically shown when a member creates an album without uploading their own cover photo.
If you leave this setting empty, no default photo will be displayed.
|
💡 Note: You can upload photos from the File & Media Manager. |
When you select a photo from the drop-down list and click Save Changes, the selected image becomes the default album cover.

Create a new music album from the Music Home page.
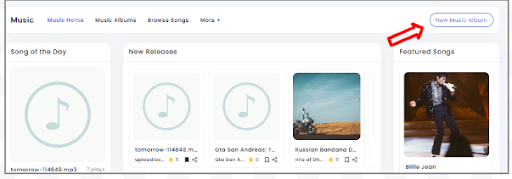
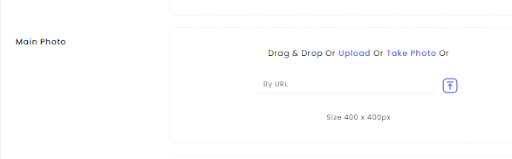
While creating the album, members can leave the Cover Photo field empty if they do not want to upload their own image.
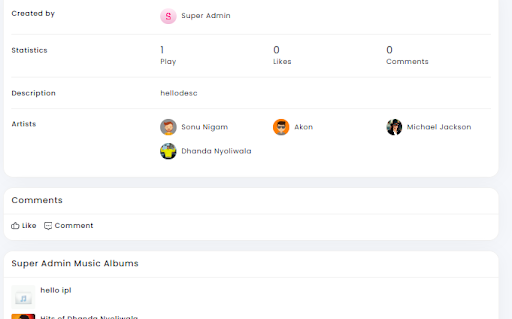
After the album is created, the default cover photo selected by the admin is automatically displayed as the album cover.
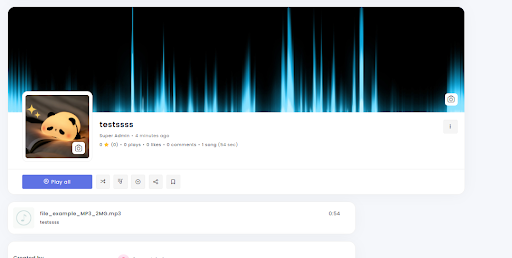
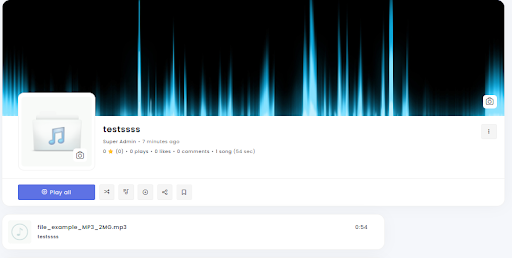
If the admin leaves this setting empty, no default cover photo will be shown.

In this case, the album will display the default music icon instead of a cover photo.
Music Album Default Cover Photo
This setting works the same way as Music Album Default Photo, but it is used specifically for the album cover photo displayed on the music album page.
Admins can select a default cover photo that will automatically appear when a member creates a music album without uploading a cover image.
|
💡 Note: You can upload images from the Appearance < File & Media Manager. |
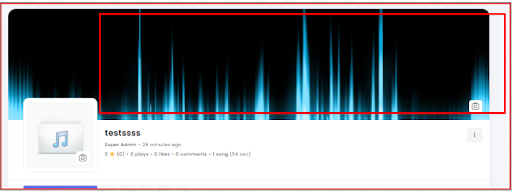
If this setting is left empty, the album will display the default music icon instead of a cover photo.

If a member does not upload a cover photo, the default cover photo selected by the admin will be shown. Once the member uploads a custom cover photo, the default photo will be removed.
The Song Settings section allows admins to manage how songs behave on the music plugin. Most settings in this section work the same way as the corresponding Music Album Settings. The only difference is that these settings apply to songs instead of music albums.
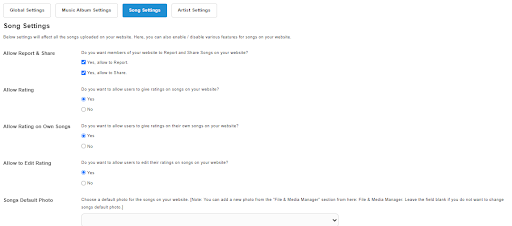
Allow Report & Share
This setting works the same way as Allow Report & Share under Music Album Settings, but it applies to songs.
Members can report songs.
Members can share songs.
Or can choose any one of them
Allow Rating
This setting works the same way as Allow Rating under Music Album Settings, but it applies to songs.
When enabled, members can rate songs. The additional settings Allow Rating on Own Songs and Allow to Edit Rating function the same way as they do for music albums.
Songs Default Photo
This setting works the same way as Music Album Default Photo, but it applies to songs.
If a member uploads a song without selecting a song photo, the default song photo selected by the admin will be displayed.
Songs Default Cover Photo
This setting works the same way as Music Album Default Cover Photo, but it applies to song cover photos.
If a member does not upload a cover photo, the default cover photo selected by the admin will be displayed.
Allow Rating
This setting helps to give ratings on the artists. It works only if this setting is disabled, members will not be able to submit ratings for artists.
When the admins selects Yes, the following additional setting becomes available:
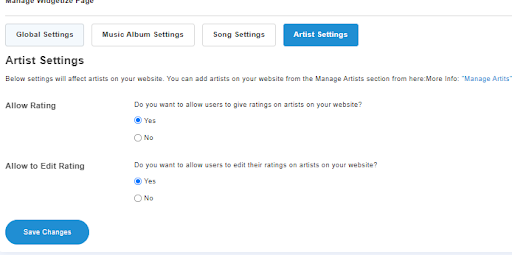
Allow to Edit Rating
This setting allows members to edit the ratings they have previously submitted for artists.
Yes: Members can update their ratings at any time.
No: Once a rating has been submitted, it cannot be changed.
When this setting is enabled, members will see the option to edit their own rating on the artist profile page.
The Manage Music Albums page allows admins to view, search, approve, and manage all music albums created by members on the website. Admins can monitor uploaded albums, review pending approvals, feature or sponsor albums, and remove inappropriate content when necessary.
Search Filter
Use the search filters to quickly find specific music albums.

|
Filter |
Working |
|
Music Album Title |
Search for a music album by entering its title. |
|
Owner Name |
Search for albums created by a specific member. |
|
Creation Date |
Filter albums based on the date they were created. |
|
Rated |
Filter albums based on their rating status. |
|
Sponsored |
Display only sponsored or non-sponsored albums. |
|
Featured |
Display only featured or non-featured albums. |
|
Category |
Filter albums belonging to a specific category. |
|
Sub Category |
Narrow the search to a selected subcategory. |
|
Sub Sub Category |
Further refine the search within the selected category hierarchy. |
|
Search |
Displays albums matching the selected search criteria. |
Music Albums Table
The table displays all music albums available on the website along with their current status and available management options.
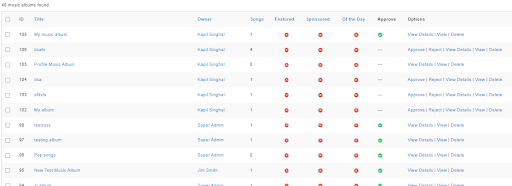
|
Column |
Working |
|
Select |
Select one or more albums to delete at once |
|
ID |
Displays the unique ID assigned to the music album. |
|
Title |
Displays the title of the music album. Click the title to view its details. |
|
Owner |
Displays the member who created the music album. |
|
Songs |
Displays the total number of songs added to the album. |
|
Featured |
Indicates whether the album is marked as Featured. |
|
Sponsored |
Indicates whether the album is marked as Sponsored. |
|
Of the Day |
Indicates whether the album has been selected as a Music Album of the Day. |
|
Options |
Provides actions depending on the album's current status: Approve: Approves a pending music album, making it available on the website. Reject: Rejects a pending music album, preventing it from being published. View Details: Displays detailed information about the selected music album. View: Opens the music album on the front-end exactly as members see it. Delete: Permanently removes the music album from the website. This action cannot be undone. |
The Manage Songs page allows admins to view, search, and manage all songs uploaded by members on the website. Admins can monitor uploaded songs, review song details, remove inappropriate content, and manage songs efficiently.
This page also allows admins to select Songs of the Day, which are displayed randomly in the Album / Song / Artist / Playlist of the Day widget.
Search Filters
Use the search filters to find specific songs quickly.

|
Filter |
Description |
|
Song Title |
Search for a song by entering its title. |
|
Owner Name |
Search for songs uploaded by a specific member. |
|
Music Album Title |
Search for songs that belong to a particular music album. |
|
Song Lyrics |
Search for songs containing specific lyrics or keywords. |
|
Creation Date |
Filter songs based on the date they were uploaded. |
|
Artist |
Display songs uploaded by a selected artist. |
|
Rated |
Filter songs based on their rating status. |
|
Sponsored |
Display only sponsored or non-sponsored songs. |
|
Featured |
Display only featured or non-featured songs. |
|
Category |
Filter songs belonging to a specific category. |
|
Search |
Displays songs matching the selected search criteria. |
Songs Table
The table displays all songs uploaded to the website along with their details and available management actions.
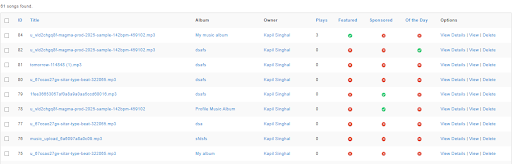
|
Column |
Description |
|
Select |
Select one or more songs for bulk actions (if available). |
|
ID |
Displays the unique ID assigned to the song. |
|
Title |
Displays the title or filename of the uploaded song. Click the title to view more information. |
|
Album |
Displays the music album to which the song belongs. |
|
Owner |
Displays the member who uploaded the song. |
|
Plays |
Displays the total number of times the song has been played. |
|
Featured |
Indicates whether the song is marked as Featured. |
|
Sponsored |
Indicates whether the song is marked as Sponsored. |
|
Of the Day |
Indicates whether the song has been selected as a Song of the Day. |
|
Options |
Provides actions such as View Details, View, and Delete. |
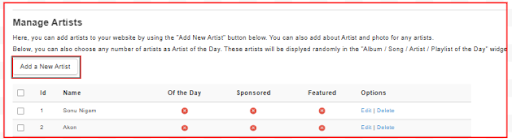
The Manage Artists page allows admins to create and manage artists that can be associated with songs on the website. Admins can add new artists, update artist information, and remove artists that are no longer required.
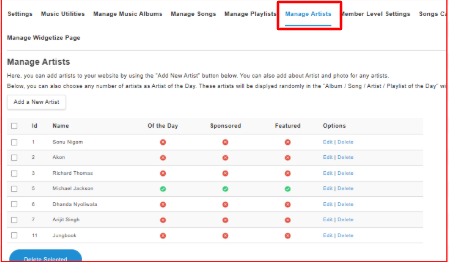
Add New Artist
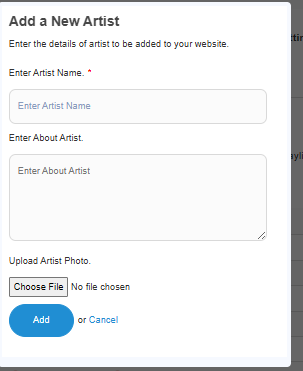
Click Add a New Artist to create a new artist. A pop-up window will appear where you can enter the artist's information.
|
Field |
Description |
|
Enter Artist Name |
Enter the name of the artist. This field is required. |
|
Enter About Artist |
Add a short description or biography about the artist. |
|
Upload Artist Photo |
Upload a profile photo for the artist. |
|
Add |
Saves the artist and adds them to the artist list. |
|
Cancel |
Closes the pop-up without saving the artist. |
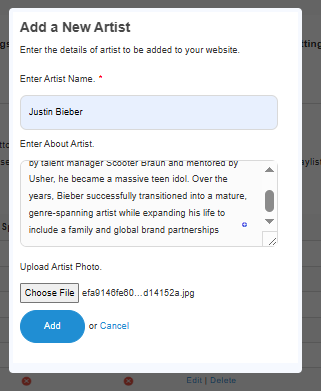
Enter all the required fields of the artist you want to keep. Then click “Add”.
In the table, you will get details saved of your artists you have added.
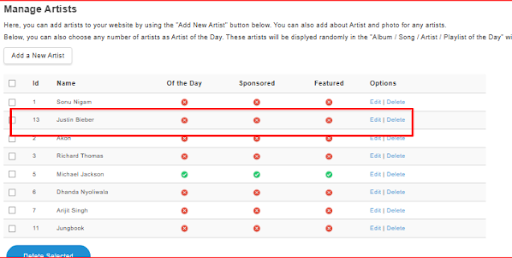
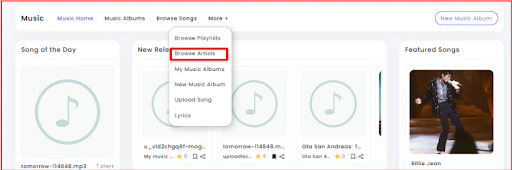
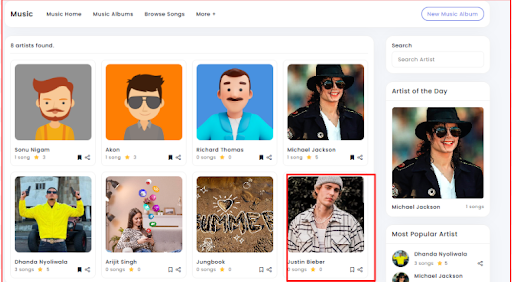
Users can view the artists added in the widget “Browse artists”
Manage Artist Table
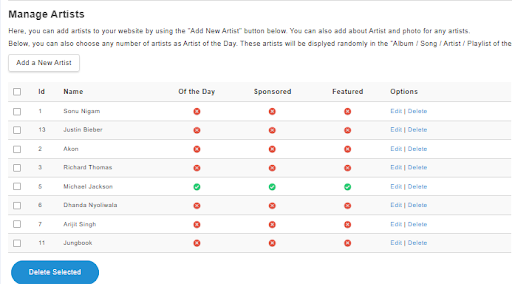
The table displays all artists available on the website.
|
Column |
Description |
|
Select |
Select one or more artists to perform bulk deletion using the Delete Selected button at the bottom. |
|
ID |
Displays the unique ID assigned to the artist. |
|
Name |
Displays the name of the artist. |
|
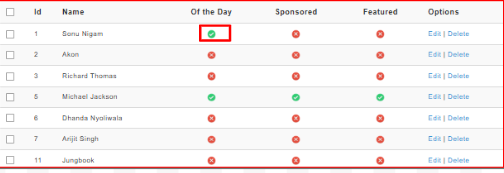
Of the Day |
Indicates whether the artist has been marked as Artist of the Day. |
|
Edit |
Opens the artist details, which allows the admins to update the artist's name, description, and photo. 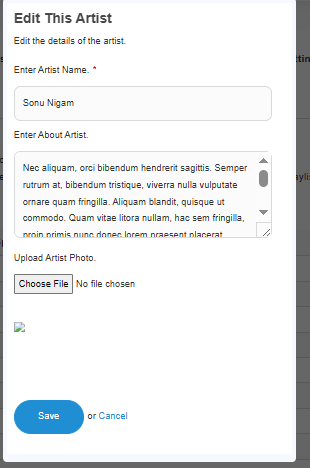
|
|
Delete |
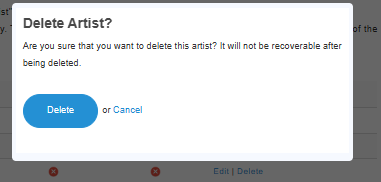
Permanently removes the selected artist from the website. A pop-up window will appear; then select Delete to remove or Cancel to not delete the artist. This action cannot be undone.
|
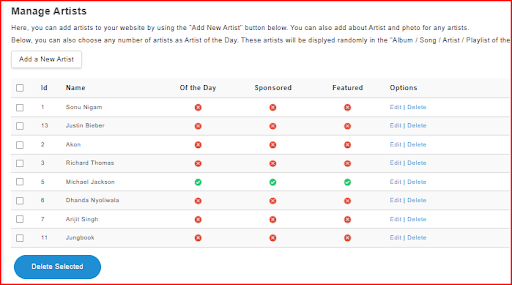
When you click Of the Day, a pop-up window appears.
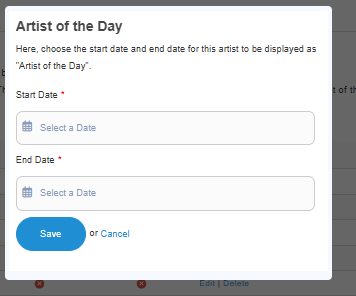
Select the Start Date and End Date to define the period during which the artist will be displayed as the Artist of the Day.
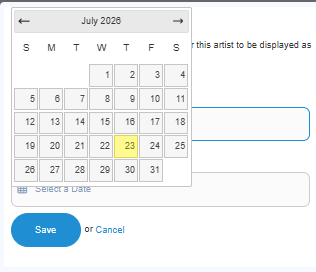
After selecting the required dates, click Save Changes to apply the settings or Cancel to close the pop-up without saving.
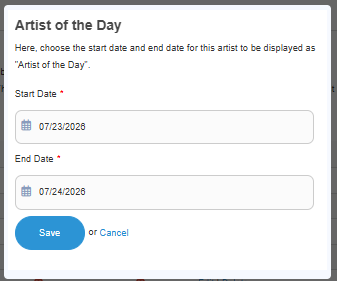
Once the changes are saved, the Of the Day column displays a green tick, indicating that the artist has been successfully marked as Artist of the Day.
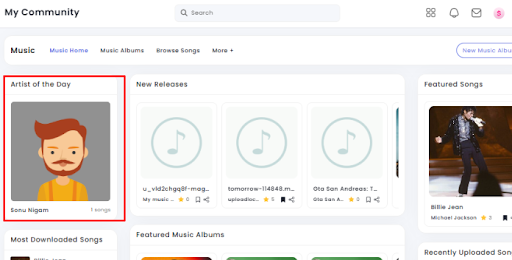
Members can view the Artist of the Day on the Music page during the selected date range.
|
Note: To change the placement of the Artist of the Day widget, go to Appearance < Layout Editor, open the desired page, locate the Artist of the Day widget, and drag and drop it to the preferred location. |
The Member Level Settings page allows admins to control what members of a specific Member Level can do within the Professional Music Plugin.
You can configure permissions such as viewing music albums, creating albums, uploading songs, and other music-related activities for each member level separately.
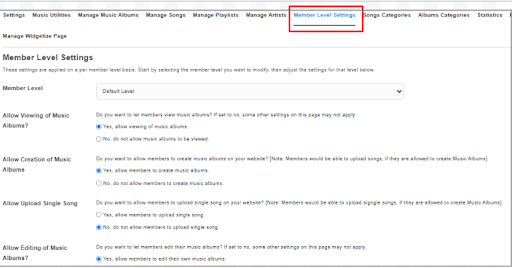
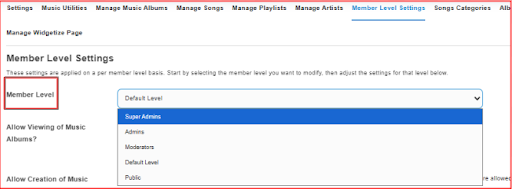
Member Level
Select the member level whose music permissions you want to manage. After making the desired decision, go to the bottom and click Save Changes to update your settings.
Allow Viewing of Music Albums
This setting controls whether members can view music albums on the website.
Yes: Members can browse and view all music albums they have permission to access.
No: Members cannot view music albums. Other music-related settings on this page may not apply if viewing is disabled.
After making the desired changes, click Save Changes to apply the updated settings.

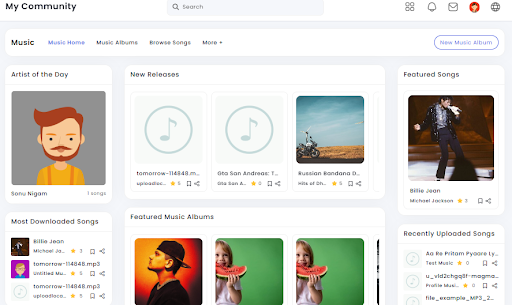
When "Yes" is selected, members belonging to the selected member level can view the Music Albums page.
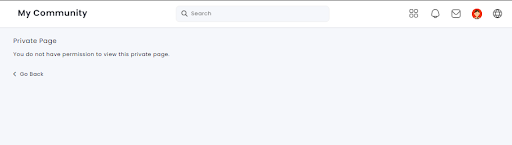
When "No" is selected, members belonging to the selected member level cannot view the Music Albums page.
Allow Creation of Music Albums
This setting controls whether members of the selected member level can create music albums on the website.

Yes: Members can create music albums. As a result, Users will be able to create the music albums on the website.
No: Members cannot create music albums. As a result, they will not be able to create the music albums.
This setting controls whether members of the selected member level can upload the single songs on the website.

Yes: Members can upload single song. As a result, Users will be able to upload the single songs on the website.
No: Members cannot upload single song. As a result, they will not be able to upload the single songs.
After making the desired changes, click Save Changes to apply the updated settings.
Allow Editing of Music Albums
This setting controls whether members of the selected member level can edit the music albums they have created.
|
Option |
Description |
|
Yes |
Members can edit their own music albums and update details such as the title, description, cover photo, songs, and other album information. |
|
No |
Members cannot edit their music albums after they have been created. |
Allow Editing of Songs
This setting controls whether members can edit the songs they have uploaded.
|
Option |
Description |
|
Yes |
Members can edit the details of their uploaded songs. |
|
No |
Members cannot modify their songs after uploading them. |
Allow Deletion of Music Albums
This setting controls whether members can delete their own music albums.
|
Option |
Description |
|
Yes |
Members can permanently delete their own music albums. |
|
No |
Members cannot delete their music albums. |
Allow Deletion of Songs
This setting controls whether members can delete the songs they have uploaded.
|
Option |
Description |
|
Yes |
Members can permanently delete their uploaded songs. |
|
No |
Members cannot delete their songs. |
Allow Rating on Music Albums
This setting controls whether members can rate music albums.
|
Option |
Description |
|
Yes |
Members can rate music albums using the available rating system. |
|
No |
Members cannot rate music albums. |
Allow Rating on Songs
This setting controls whether members can rate songs.
|
Option |
Description |
|
Yes |
Members can submit ratings for songs. |
|
No |
Members cannot rate songs. |
Allow Rating on Artists
This setting controls whether members can rate artists.
|
Option |
Description |
|
Yes |
Members can submit ratings for artists. |
|
No |
Members cannot rate artists. |
Allow Adding Music Albums to Playlist
This setting controls whether members can add music albums to their playlists.
|
Option |
Description |
|
Yes |
Members can add music albums to their playlists. |
|
No |
Members cannot add music albums to playlists. |
Allow Adding Songs to Playlist
This setting controls whether members can add songs to their playlists.
|
Option |
Description |
|
Yes |
Members can add songs to their playlists. |
|
No |
Members cannot add songs to playlists. |
Allow Downloading of Songs
This setting controls whether members can download songs.
|
Option |
Description |
|
Yes |
Members can download songs from the website. |
|
No |
Members cannot download songs. |
Allow Commenting on Music Albums
This setting controls whether members can post comments on music albums.
|
Option |
Description |
|
Yes |
Members can comment on music albums. |
|
No |
Members cannot comment on music albums. |
Music Album View Privacy
This setting determines which privacy options are available to members when choosing who can view their music albums. Members will only see the options selected by the admins.
|
Privacy Option |
Description |
|
Everyone |
Anyone can view the music album. |
|
All Registered Members |
Only logged-in members can view the music album. |
|
Friends or Networks |
Friends and members within the same network can view the music album. |
|
Friends of Friends |
Friends and their friends can view the music album. |
|
Friends Only |
Only friends can view the music album. |
|
Just Me |
Only the music album owner can view the music album. |
Music Album Comment Options
This setting determines who members can allow to comment on their music albums. The available options are the same as the Music Album View Privacy settings.
Allow to Choose Network Privacy
This setting controls whether members can choose a network privacy option for their music albums.
|
Option |
Description |
|
Yes |
Members can select network privacy while creating or editing music albums. |
|
No |
Members cannot choose network privacy. |
Auto Approve Music Albums
This setting controls whether music albums created by the selected member level require admin approval.
|
Option |
Description |
|
Yes |
Music albums are published immediately after creation. |
|
No |
Music albums remain pending until approved by an admins. |
Maximum Allowed Music Albums
Specify the maximum number of music albums a member can create.
|
Value |
Description |
|
0 |
No limit. Members can create unlimited music albums. |
|
Any Positive Number |
Members can create only the specified number of music albums. |
Maximum Allowed Playlists
Specify the maximum number of playlists a member can create.
|
Value |
Description |
|
0 |
No limit. Members can create unlimited playlists. |
|
Any Positive Number |
Members can create only the specified number of playlists. |
Allow members to draft content using AI when creating a new entry?
This setting controls whether members of the selected member level can use Draft with AI while creating a new music album or song.
|
Option |
Description |
|
Yes |
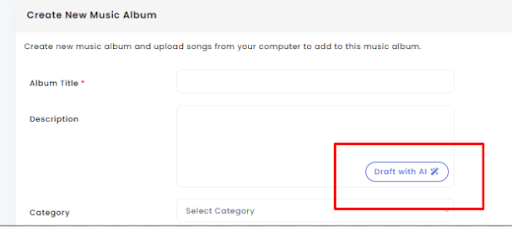
Members will see the Draft with AI button when creating a new music album or song. AI generates a description based on the title and selected word count. |
|
No |
Members will not see the Draft with AI option while creating new content and must enter the description manually. |
If enabled, then the button for AI will appear like the image below.
Allow members to draft or regenerate content using AI when editing an existing entry?
This setting controls whether members of the selected member level can use AI while editing an existing music album or song.
|
Option |
Description |
|
Yes |
Members can use the Draft with AI feature to regenerate or rewrite the existing description while editing their content. |
|
No |
Members will not be able to use AI while editing existing content and must update the description manually. |
Audio Upload Size
Enter the maximum file size that members of this level are allowed to upload in numbers, in this example, we are keeping 100 and then click Save Changes.

On the user side, navigate to the Music page and click Create New Album.
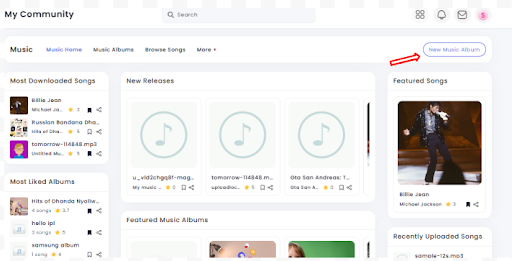
We have set the Audio Upload Size limit to 100 MB for that member level, so it can upload audio files up to 100 MB in size.
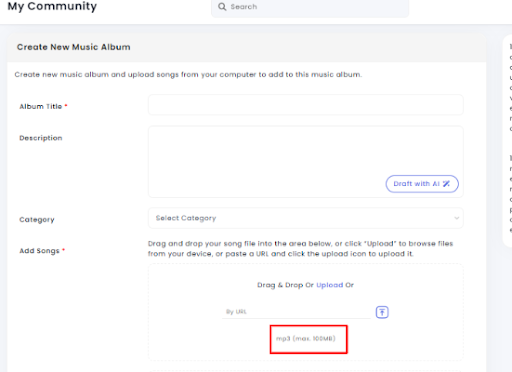
If you try to upload an audio file that exceeds the allowed size limit, an error message will be displayed, and the file will not be uploaded. Reduce the file size or choose a smaller audio file to complete the upload successfully.
The Songs Categories section allows admins to create and manage categories for songs. Categories help organize songs, making it easier for members to classify their content and for other members to browse music based on categories.
Admins can create new categories, edit existing ones, assign profile types, upload category icons, and create custom form fields for each category.
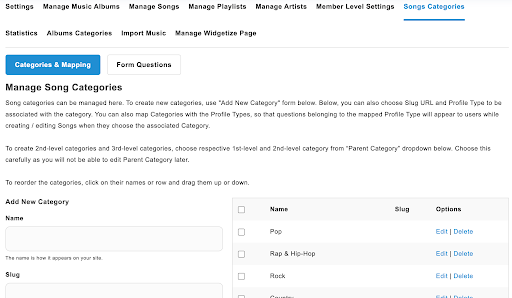
1. Categories & Mapping
This section allows you to create new song categories and manage existing ones.
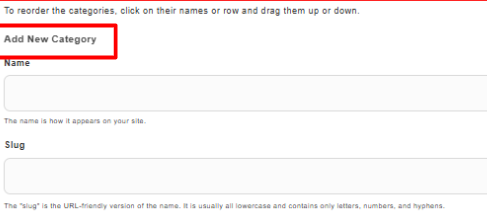
Add New Category
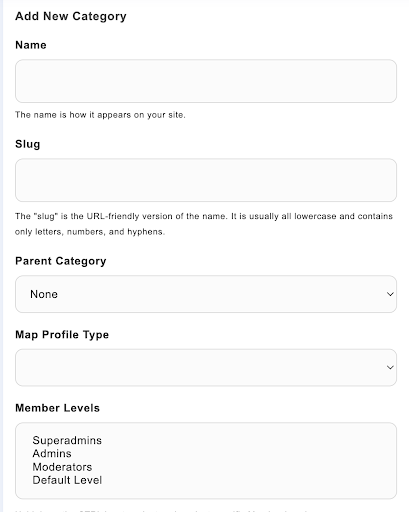
Fill in the required fields to create a new song category.
|
Field |
Description |
|
Name |
Enter the name of the song category. This name is displayed throughout the website. |
|
Slug |
Enter a unique URL-friendly version of the category name. Usually, this contains lowercase letters, numbers, and hyphens. |
|
Parent Category |
Select a parent category if you want to create a sub-category. Leave None to create a main category. |
|
Map Profile Type |
Associate the category with a profile type. Members selecting this category will see the corresponding custom fields. |
|
Member Levels |
Select which member levels can access and use this category. Hold the Ctrl key to select multiple member levels. |
After filling in the required fields, save the category.
Edit Category
Beside the Add New Category button, you will find a table that lists all the categories. Click Edit next to a category to update its information.
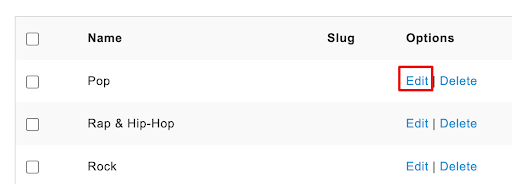
The Edit Category page contains the same fields used while creating a category.
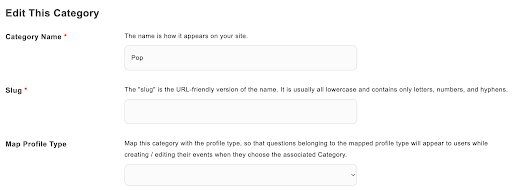
Admins can modify:
Category Name
Slug
Profile Type Mapping
Member Levels
After making the required changes, click Save Changes to apply the updates.
Delete Category
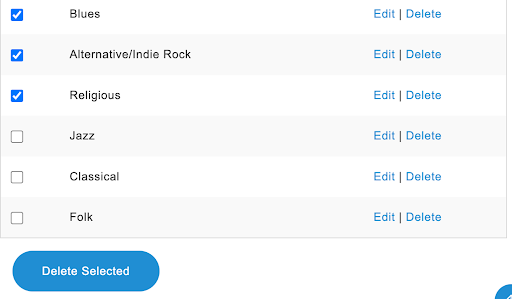
From the same table, admins can delete a single category or remove multiple categories in bulk.
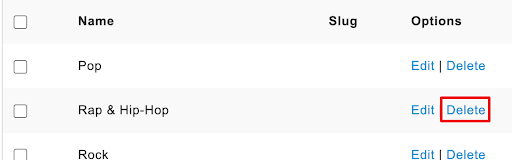
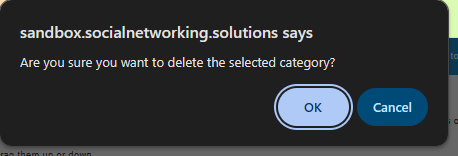
When deleting a category, a confirmation pop-up appears. Click OK to delete the category, or click Cancel to discard the action.
To delete multiple categories, select the required categories, choose the bulk action, and click Delete Selected.
2. Form Questions
The Form Questions tab allows admins to create custom fields for different song categories.
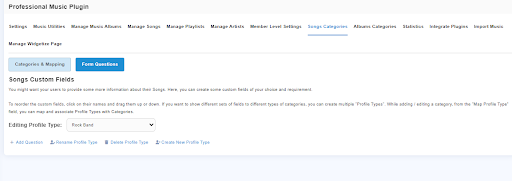
For example:
Pop songs can have different fields.
Rock songs can have different fields.
Classical songs can have different fields.
This ensures members only see the fields relevant to the category they select.
|
Option |
Description |
|
Editing Profile Type |
Select the profile type you want to manage. |
|
Add Question |
Create a new custom field for the selected profile type. |
|
Rename Profile Type |
Change the name of the selected profile type. |
|
Delete Profile Type |
Remove the selected profile type and its associated questions. |
|
Create New Profile Type |
Create a new profile type with its own set of custom fields. |
The Albums Categories section works in the same way as the Songs Categories section. It allows admins to create and manage categories for music albums, helping organize albums and making them easier for members to browse.
All settings, category mappings, profile types, custom fields, member-level permissions, icons, thumbnails, and category management options function in the same manner as Songs Categories.
The only difference is that these categories are applied to music albums instead of songs.
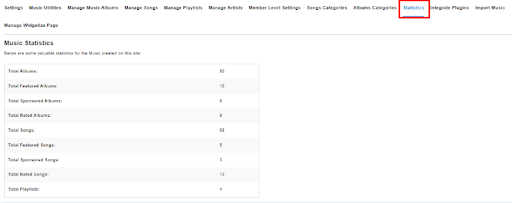
The Statistics page provides an overview of the content created within the Professional Music Plugin. It displays the total number of music albums, songs, playlists, and other related statistics available on your website.
Music Statistics Table
The table displays the current statistics for the music content available on your website.
|
Statistic |
Description |
|
Total Albums |
Displays the total number of music albums created on the website. |
|
Total Featured Albums |
Displays the total number of albums marked as Featured. |
|
Total Sponsored Albums |
Displays the total number of albums marked as Sponsored. |
|
Total Rated Albums |
Displays the total number of albums that have received ratings from members. |
|
Total Songs |
Displays the total number of songs uploaded to the website. |
|
Total Featured Songs |
Displays the total number of songs marked as Featured. |
|
Total Sponsored Songs |
Displays the total number of songs marked as Sponsored. |
|
Total Rated Songs |
Displays the total number of songs that have received ratings from members. |
|
Total Playlists |
Displays the total number of playlists created on the website. |
|
💡 Note: These statistics are read-only and cannot be edited manually. |
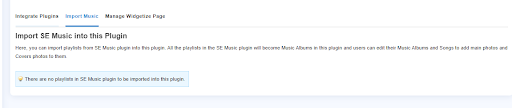
The Import Music page allows admins to import playlists from the SocialEngine Music Plugin (SE Music Plugin) into the Professional Music Plugin.
During the import process:
Existing playlists from the SE Music Plugin are converted into Music Albums.
The songs within those playlists are imported into the corresponding music albums.
After the import is complete, members can edit the imported music albums by adding album photos, cover photos, and updating other album details.
|
Note: This feature is only applicable if the SE Music Plugin is installed and contains playlists. |
|
💡 Note This feature is intended for websites that are migrating from the SE Music Plugin to the Professional Music Plugin. If the SE Music Plugin is not installed or does not contain any playlists, there will be no music available to import. |
The Manage Widgetized Page section lists all the pages available in the Professional Music Plugin. From here, admins can quickly open any page in the Layout Editor to customize its layout or click View Page to preview how it appears on the website.
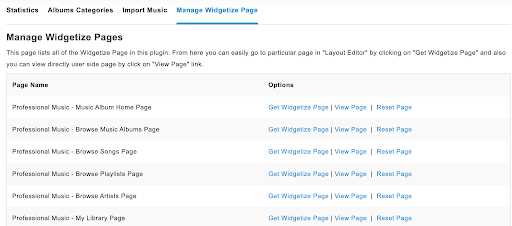
|
Column |
Description |
|
Page Name |
Displays the name of the page available in the Professional Music Plugin. |
|
Get Widgetize Page |
Opens the selected page in the Layout Editor, where admins can customize the layout by adding, removing, or rearranging the available blocks. |
|
View Page |
Opens the selected page on the user side to preview how it appears to members after the layout has been configured. |
|
Reset Page |
Resets the page according to the default installation. |
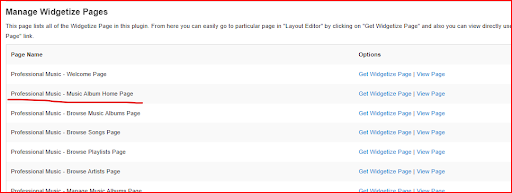
Understanding the Layout Editor Options
The Layout Editor provides several options to help you customize the appearance of your pages. Below is an explanation of each option.
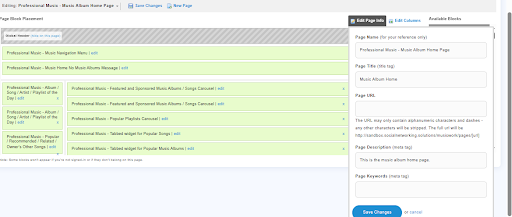
Edit Page Info
Click Edit Page Info to update the basic information for the selected page.
From here, you can modify:
Page Name
Page Title
Page URL
Page Description
Keywords
After making the required changes, click Save Changes to apply them, or click Cancel to discard the changes.
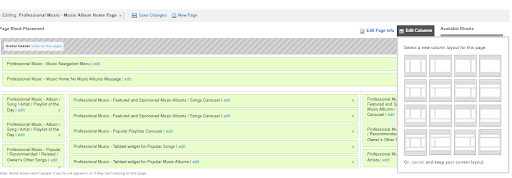
Edit Columns
Click Edit Columns to change the page layout.
You can select the column structure that best suits your page, such as one-column, two-column, or three-column layouts (depending on the available options).
After selecting the desired layout, click Save Changes to apply it, or click Cancel to keep the existing layout.
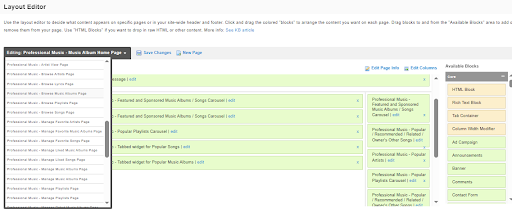
Editing
The Editing drop-down allows you to quickly switch between different pages available in the Layout Editor.
Simply select the page you want to customize, and its layout will open for editing.
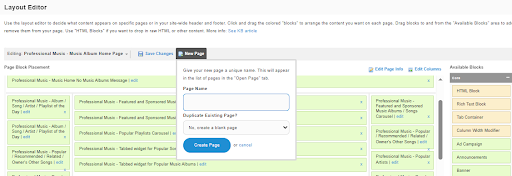
New Page
Click New Page to create a new custom page.
Enter the required page details, such as the Page Name, and choose whether you want to duplicate the layout of an existing page or create a blank page.
After entering the required information, save the page to add it to your website.
Edit or Remove Blocks
To customize a page, you can also edit or remove the available blocks.
Click Edit on a block to modify its settings and configure how it is displayed.
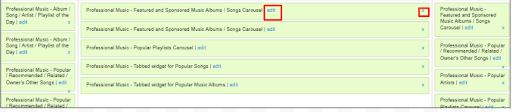
Click Remove to delete the block from the selected page.
After updating the block settings, click Save Changes to apply the changes.