Notifications
Use the Theme Editor to change the Theme of your site. You can pick from an available Theme, upload a purchased Theme, change colors with the “Color Variant” tool, or customize it with your own CSS code.
Please see the additional instructions for the Elpis, Serenity, or Inspira Themes.
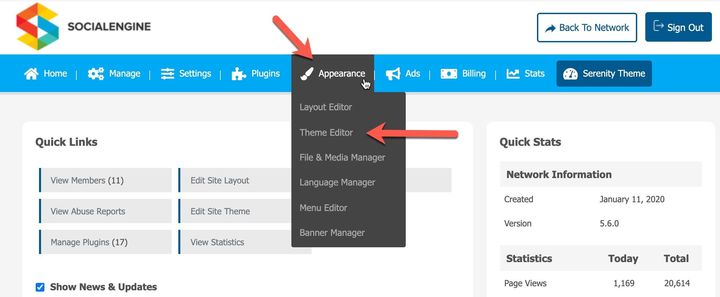
To reach the Theme Editor, in your Admin panel navigate to Appearance > Theme Editor.

When you arrive at the Theme Editor page, your currently active Theme will show at the top of the page. We will show you how to change to a different Theme, edit your Theme’s CSS, and Upload Themes in this tutorial.
Under “Available Themes”, click on the "Activate Theme" button next to the Theme that you want to use for your site. Your currently active Theme will also show in the list but won’t have an “Activate Theme” button as it is already active.
There are two ways to upload a Theme to your site:
Using the Package Manager (Recommended)
Themes need to be formatted correctly in order to be read and displayed properly by the software, which is why we recommend uploading a new Theme via the Package Manager. The Package Manager will automatically format the Theme into the correct format. In order to upload a Theme using the Package Manager, you will need to have a .tar file of the Theme and upload as shown in the Package and Plugin Installation article.
Using the Theme Editor
If you want to upload your own Theme that you know is correctly formatted, you can click on “Upload New Theme”.

Fill out the form and then click on "Upload".
This will add your theme to the list of "Available Themes". If you run into an error, please try the first method previously mentioned to install the Theme via the Package Manager.
To download a copy of your current Theme, click on "Export" to the right of “Active Theme”. 
Cloning Your Theme
To create a copy of your current Theme, click on "Clone" to the right of “Active Theme”.
Click on the arrow to the right of the xxxxxxx.css file to select which file to edit.
Make changes to the CSS style of your current Theme in the text window. When you have finished, click on "Save Changes" to save your changes 
The “constants.css” and “theme.css” CSS files contain the main layout of your Theme. However, there are also CSS files located throughout the source for the styling of individual modules. They are usually located in the application/module/{the module you would like to edit}/externals/styles/main.css file. For example, there is a script that styles the Music pages for the Music Plugin which would be located in: application/module/Music/externals/styles/main.css. If you have our Mobile plugin installed, the mobile.css files control the layout of the Mobile version of your pages.
If you need to revert changes that you made, and set the Theme back to original condition, click “Revert” to the far right of “Active Theme.” Note that this will delete all changes that you’ve made so you might want to have a copy of your changes in a text file on your computer.
If you have a different concept of how you would like your site to look, you have nothing to fear. We do not limit you to use only pre-created Themes. You are free to create your own Themes and skin your site to look the way you want it to look. For detailed instructions on how to create Themes, take a look at our Create Your Own Theme article.